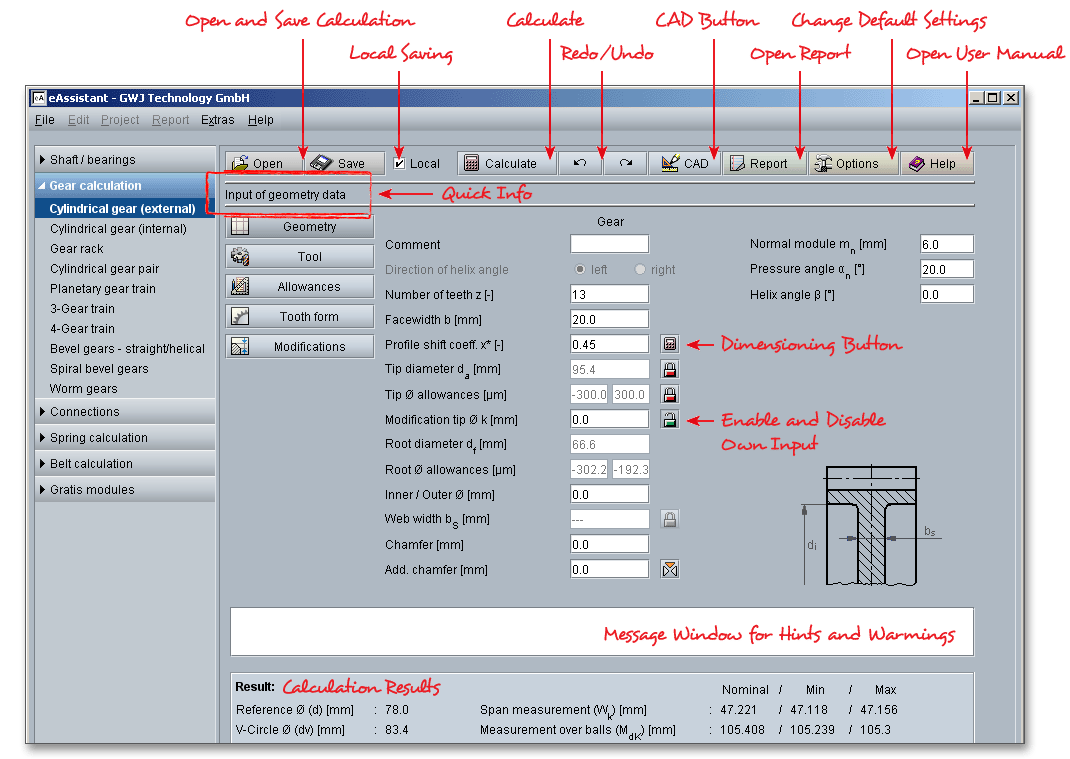
Please login with your username and your password. To start the calculation module for single cylindrical gears, please click the menu item ‘Gear calculation’ on the left side and then select ‘Cylindrical gear (external)’ or ‘Cylindrical gear (internal)’.
The eAssistant module allows an easy and fast calculation of the geometry of single cylindrical gears according to DIN 3960, DIN 3961, DIN 3964, DIN 3967, DIN 3977 and DIN 868. External spur and helical gears as well as internal gears can be calculated. Profile shift or addendum chamfer will be taken into consideration. The geometry, test dimensions and allowances of a single external or internal cylindrical gear will be determined. In order to calculate a single internal cylindrical gear, please open the module ‘Single cylindrical gear (internal)’.

All important calculation results will be calculated during every input and will be displayed in the result panel. A recalculation occurs after every data input. Any changes that are made to the user interface take effect immediately. Press the Enter key or move to the next input field to complete the input. Alternatively, use the Tab key to jump from field to field or click the ‘Calculate’ button after every input. Your entries will be also confirmed and the calculation results will displayed automatically. If the result exceeds certain values, the result will be marked red.
The normal module \(m_{n}\) is one of the basic parameters in the gear geometry and describes the size of a gear. The module is defined as the ratio of the pitch diameter to the number of teeth of a gear. Note that the larger the module the larger the teeth. The value of the module is defined in millimeters. In order to limit the number of the gears, the module has been standardised in preferred series 1 and 2 (see following tables). The calculation with the eAssistant software is possible with any modules including several decimal places.
| Series of Modules in mm According to DIN 780 Series 1 (Part 1)
| |||||||
| 0,05 | 0,06 | 0,08 | 0,10 | 0,12 | 0,16 | 0,20 | 0,25 |
| 0,3 | 0,4 | 0,5 | 0,6 | 0,7 | 0,8 | 0,9 | 1 |
| Series of Modules in mm According to DIN 780 Series 1 (Part 2)
| ||||||||
| 1,25 | 1,5 | 2 | 2,5 | 3 | 4 | 5 | 6 | 8 |
| 10 | 12 | 16 | 20 | 25 | 32 | 40 | 50 | 60 |
| Series of Modules in mm According to DIN 780 Series 2 (Part 1)
| ||||||||
| 0,055 | 0,07 | 0,09 | 0,11 | 0,14 | 0,18 | 0,22 | 0,28 | 0,35 |
| 0,45 | 0,55 | 0,65 | 0,75 | 0,85 | 0,95 | 1,125 | 1,375 | 1,75 |
| Series of Modules in mm According to DIN 780 Series 2 (Part 2)
| |||||||
| 2,25 | 2,75 | 3,5 | 4,5 | 5,5 | 7 | 9 | 11 |
| 14 | 18 | 22 | 28 | 36 | 45 | 55 | 70 |
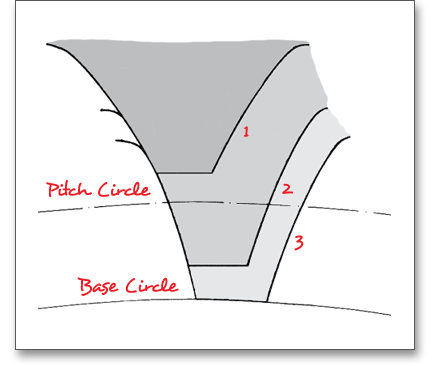
With an increasing distance from the base circle, the profile angles \(\alpha _{y}\) increase too. The most common
pressure angle now in use for spur gears is \(20^{\circ }\). The default startup setting for the pressure angle is set to
\(20^{\circ }\).
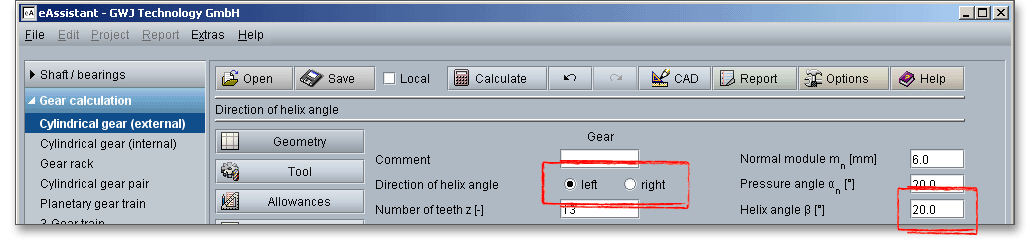
For spur gears the helix angle is \(\beta \) = \(0^{\circ }\), for helical gears the angle \(\beta \) is up to \(45^{\circ }\) due to the fact that the teeth for a helical
gear are inclined by the angle. \(45^{\circ }\) is also the maximum value that you can enter into the input field for the helix
angle. For an external gearing a right-hand teeth and a left-hand teeth can only mesh correctly. For internal
gearings pinion and gear must have the same direction.
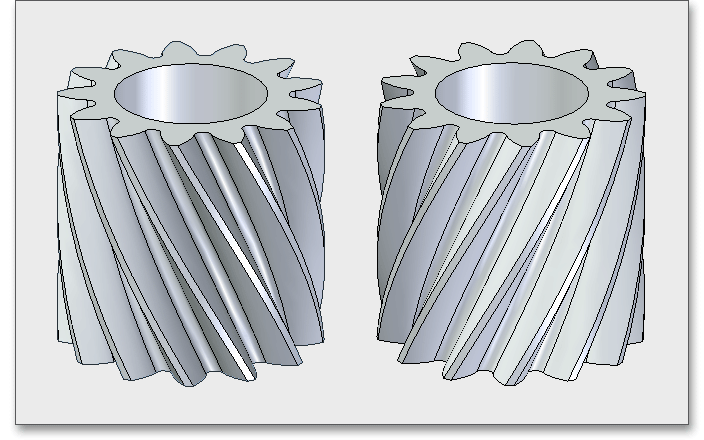
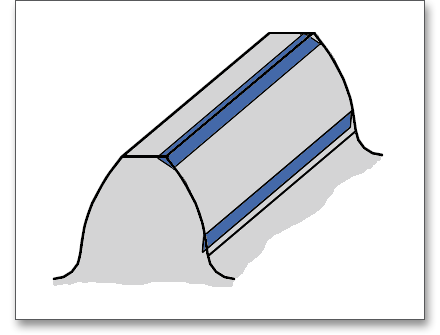
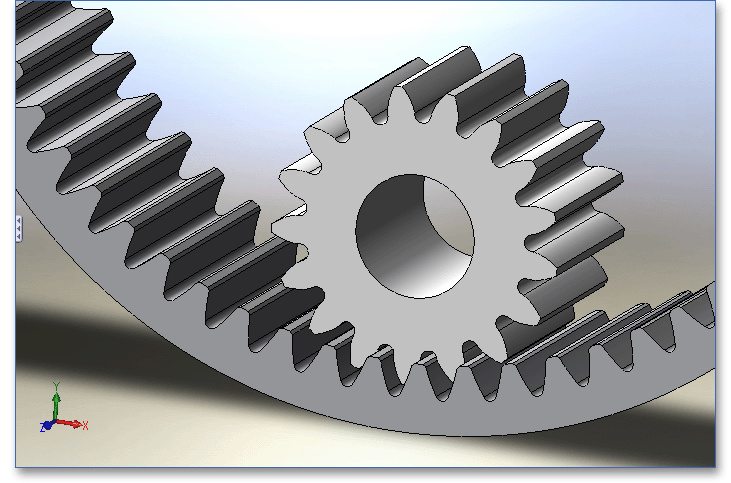
Helical gears are used to transmit power or motion between parallel shafts. Helical gears differ from spur gears in that they have teeth that are cut in the form of a helix on their pitch cylinders instead of parallel to the axis of rotation. As two teeth on the gear engage, it starts a contact on one end of the tooth which gradually spreads with the gear rotation, until the time when both the tooth are fully engaged. Finally, it recedes until the teeth break contact at a single point on the opposite side of the wheel. Thus force is taken up and released gradually. Helical gears offer a refinement over spur gears. The angled teeth engage more gradually than do spur gear teeth. This causes helical gears to run quieter and smoother than spur gears. Helical gears are used in areas requiring high speeds, large power transmission or where noise prevention is important.
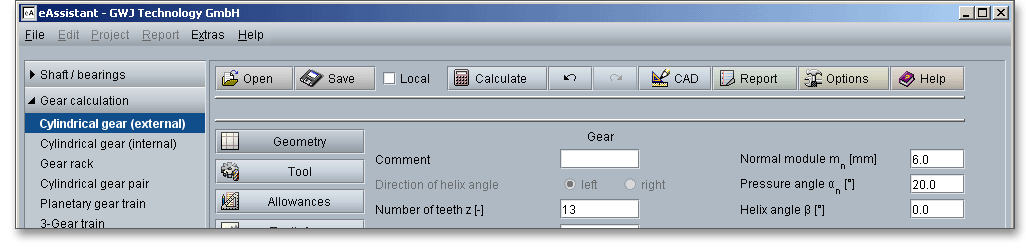
Enter a value for the direction of the helix angle. When the gear is placed on a flat surface, the teeth of a left-hand gear lean to the left and the teeth of a right-hand gear lean to the right. It should be noted that a pair of helical gears on parallel shafts must have the same helix angle \(\beta \). However, the helix directions must be opposite, i.e., a left-hand mates with a right-hand helix. For an external gear pair the engaged gearings have different directions, internal gears have the same direction with the same helix angle.
Entering an helix angle automatically activates the option to specify the direction of the helix angle and to select the checkbox.
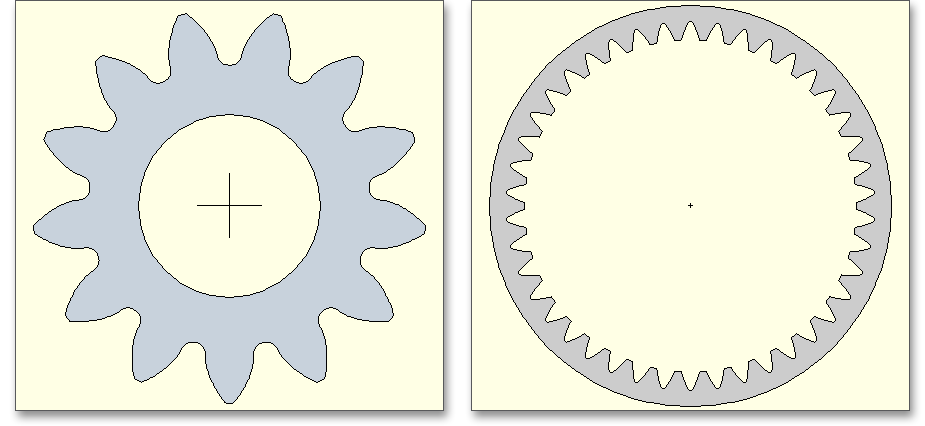
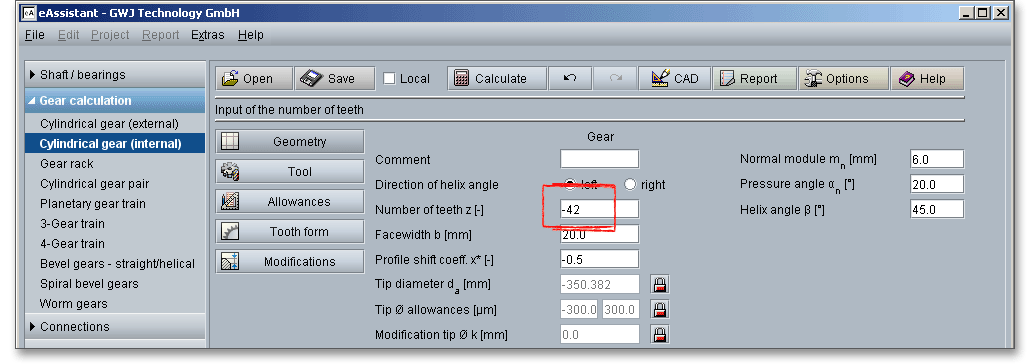
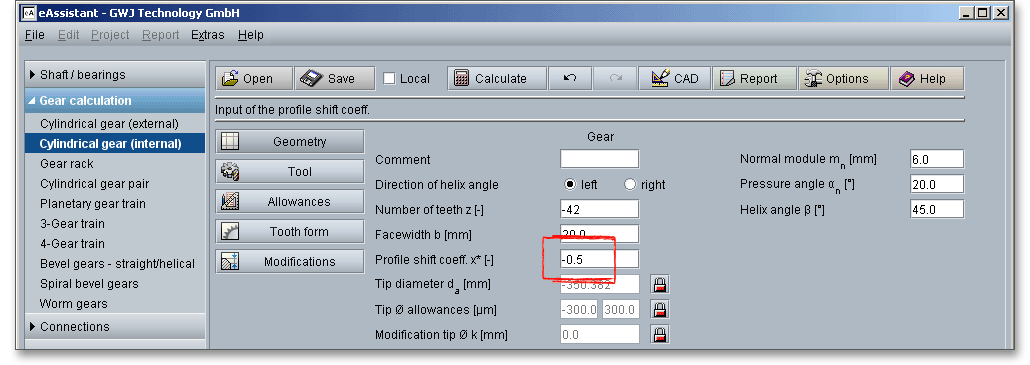
The number of teeth of a gear describes the number of the teeth on the full rim. The number of teeth is positive for external gears and negative for internal gears.
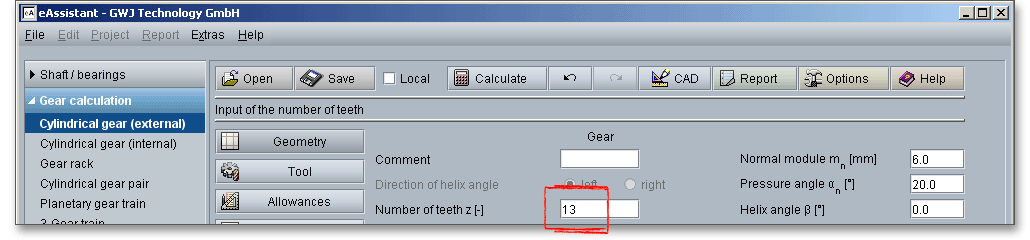
Please note that the smaller the number of teeth the larger the influence of the profile shift. By default, a
positive number of teeth appears when you open the module for single external cylindrical gears. A
negative number of teeth appears when you open the module for single internal cylindrical gears.
Please see section 6.8.3 ‘Some Notes for Internal Gears’ to get more information on this kind of
gear.
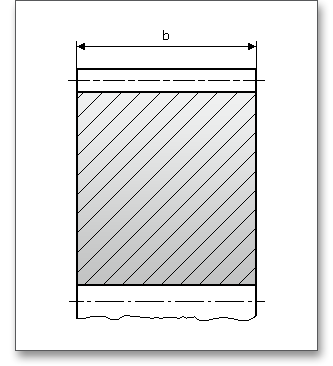
The facewidth \(b\) is the length of the gear teeth as measured along a line parallel to the gear axis.
Enter a value for the facewidth. The following table shows some additional information about the facewidth \(b\) as well as minimum number of teeth \(z\).
| Standard Values for the Facewidth \(b\) and Minimum Number of Teeth \(z\)1
| ||
| Teeth, machine-cut | Gears on rigid shafts, that run in roller or excellent plain bearings, rigid substructure | \(b \leq 30\ldots 40\cdot {m}\) |
| Gears in usual gear boxes, roller or plain bearings | \(b \leq 25\cdot {m}\) | |
| Gears on steel constructions, beams and suchlike | \(b \leq 15\cdot {m}\) | |
| Gears with excellent bearing in high duty gearings | \(b \leq 2\cdot {d_{1}}\) | |
| Teeth, cast roughly | Overhung gears | \(b \leq 10\cdot {m}\) |
| Gears with high circumferential velocity\((\upsilon > 4\ m/s)\) and considerable power,
when \(\varepsilon _{\alpha } > 1.5\) | \(z_{1} \geq 16\) | |
| Gears with mean circumferential velocity\((\upsilon = 0.8\ldots 4\ m/s)\) | \(z_{1} \geq 12\) | |
| Gears with low circumferential velocity\((\upsilon < 0.8\ m/s)\) or for low power for subordinated
purposes | \(z_{1} \geq 10\) | |
| Basically external gearings | \(z_{1} + z_{2} \geq 24\) | |
| Basically internal gearings | \(z_{2} \geq z_{1} + 10\) | |
| 1 from: Karl-Heinz Decker: Maschinenelemente: Gestaltung und Berechnung, 1992, p. 506, table
23.2
| ||
Profile shift can make spur gears or helical gears run more quietly and carry more load. If spacing errors of some magnitude are present, proper profile shift will give the teeth a little clearance at the first point of contact. If a pair of teeth are spaced too close together, there is a bump as the tooth comes into mesh. With the modification there is a little relief at the first point of contact. The profile shift affects the tooth form because the tool is shifted by the value \(xm\) towards or away from the tip circle. The calculation of the tip diameter \(d_{a}\) and root diameter \(d_{f}\) includes the profile shift coefficient \(x\). According to DIN 3960 the profile shift is
Here you have the option of dimensioning or optimizing the profile shift coefficient. To optimize the profile shift coefficient, click on the ‘Calculator’ button. In addition to the option ‘user-defined input’, the following two options are available for selection: ‘Geometric minimum’ and ‘Geometric maximum’. Here the possible limits of the profile shift, i.e. the minimum and maximum profile shift that can be executed with respect to the undercut limit and topland limit.

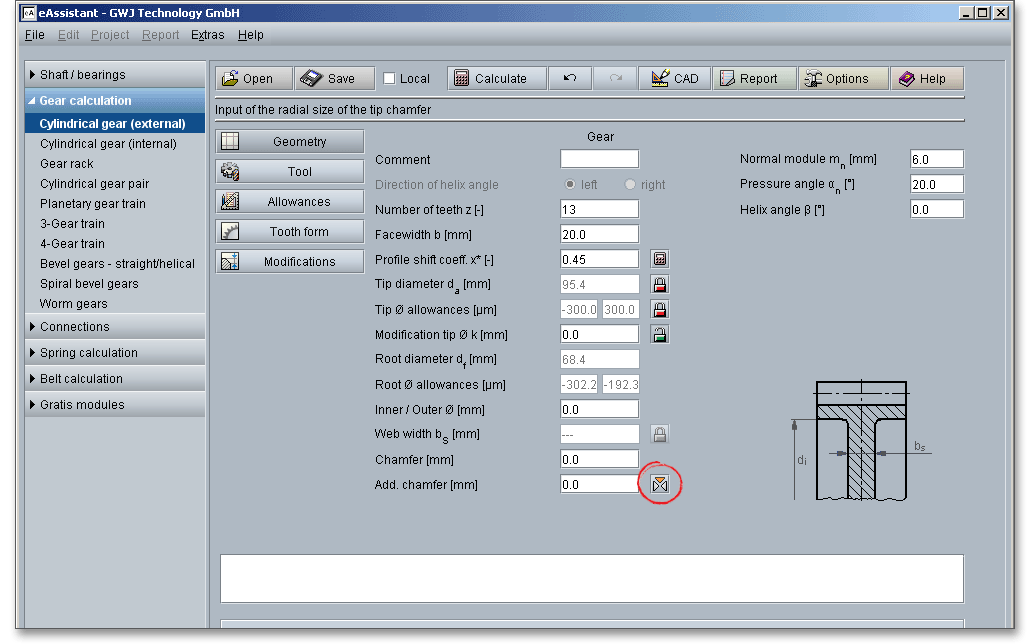
The tip diameter \(d_{a}\) depends on the module and will be determined by the program automatically. If you change
the profile shift, the tip diameter will change, too. There is the possibility to enable the tip circle using the ‘Lock’
button. Now you can add and modify the tip diameter very easily. Please note that the tip diameter has an
influence on the modification of the tip diameter. Click on the button again to disable the input field. The
value is determined again according to DIN. In case you use a special tool, the tip diameter can be
changed by a tool customization. Find out more about the tool data in the section ‘The input of tool
data’.
The tip diameter allowance is determined according to DIN. Click on the ‘Lock’ button to enable the input field
and enter your own value. If your values are out of range of the DIN, you will get an information in the message
window. Click on the ‘Lock’ button and the input field is disabled again. The allowances are determined
according to DIN.
The modification of the tip diameter \(k\) is automatically determined by the program that a sufficient tip clearance is available. For external gears the modification of the tip diameter is \(k \le 0\), for internal gears, the value is often set to \(k = 0\) in order to avoid meshing interferences. Click on the ‘Lock’ button to enable the input field and enter your own value. Such a modification of the tip diameter has an effect on the tip diameter.
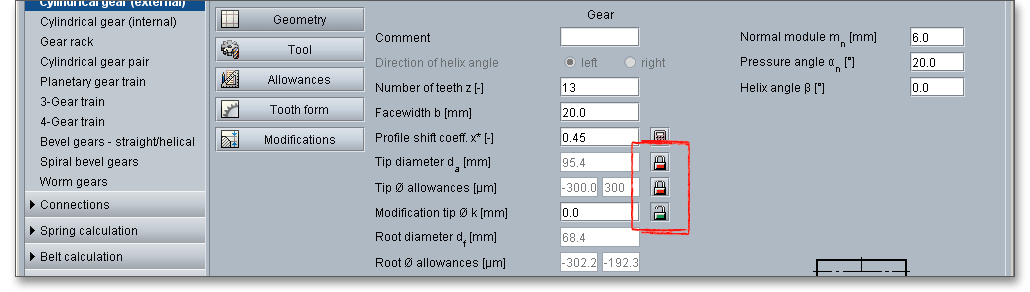
The root diameter \(d_{f}\) depends upon the module, the profile shift and addendum coefficient of the basic rack profile.
The root diameter is determined by the program. Therefore, the root diameter occurs as a result of the
calculation.
The allowances of root result from your calculation and will be determined automatically. The allowances depend upon the tooth thickness allowances. For instance, if you enter the value ‘0’ for a gear, then the allowances of root become ‘0’ for this gear as well.
Here you can enter an inner diameter (for external gears) and outer diameter (for internal gears). It should be kept in mind that the inner diameter has to be smaller than the root diameter \(d_{f}\). In case the inner diameter is larger than \(d_{f}\), then the program automatically corrects the value and enters the maximum value for the inner diameter. An appropriate message appears in the message window.
The web width can be considered here. The web width is shown in the figure next to the input field. There is the possibility to modify the web width by using the ‘Lock’ button.

The ‘Lock’ button is still disabled. Enter the values for the inner or outer diameter into the input field. Then the ‘Lock’ button is enabled and the web width gets the same value as the facewidth. In case the web width is smaller than the facewidth, then the gear body stiffness is affected due to the gear body coefficient \(C_{R}\). The tooth spring stiffness changes which affects again the load capacity.

The chamfer can be considered. This reduces the calculated facewidth for the calculation of the load capacity of the tooth root and tooth flank.
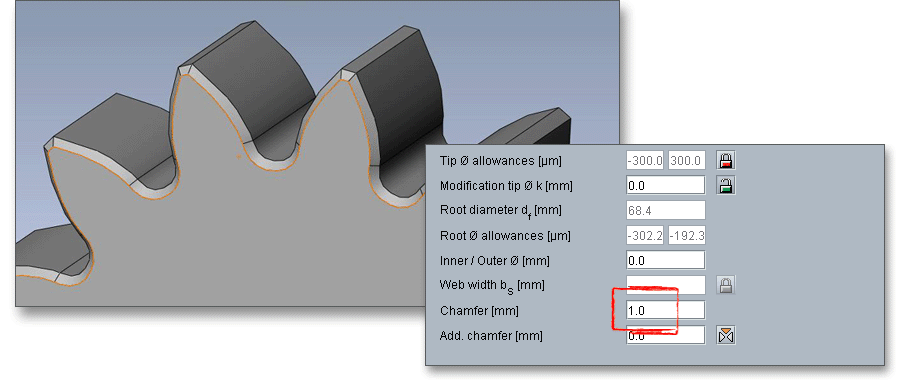
The tooth ends of a gear are often rounded or chamfered. A chamfer is a small angled surface added on the end of a shaft along an edge. For the calculation you can consider the addendum chamfer. Meshing interferences can be removed by the addendum chamfer.
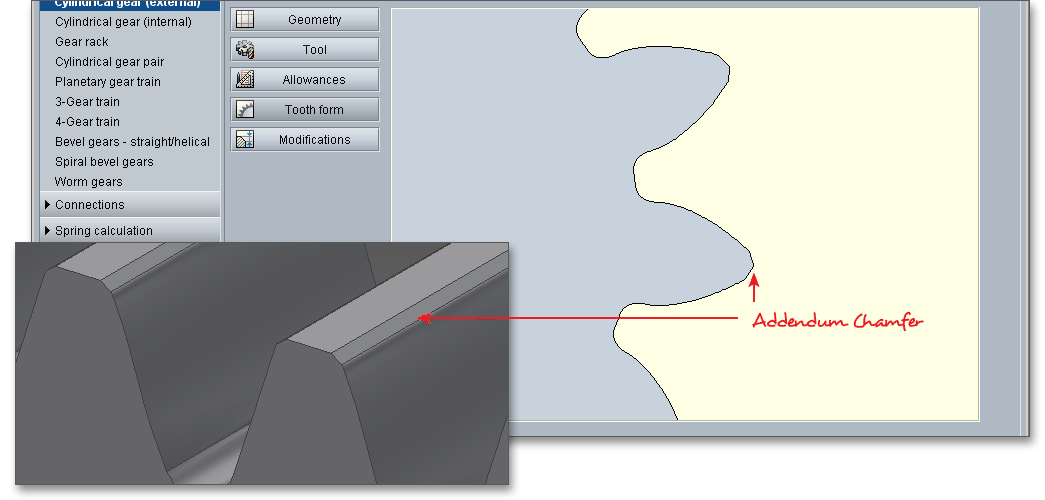
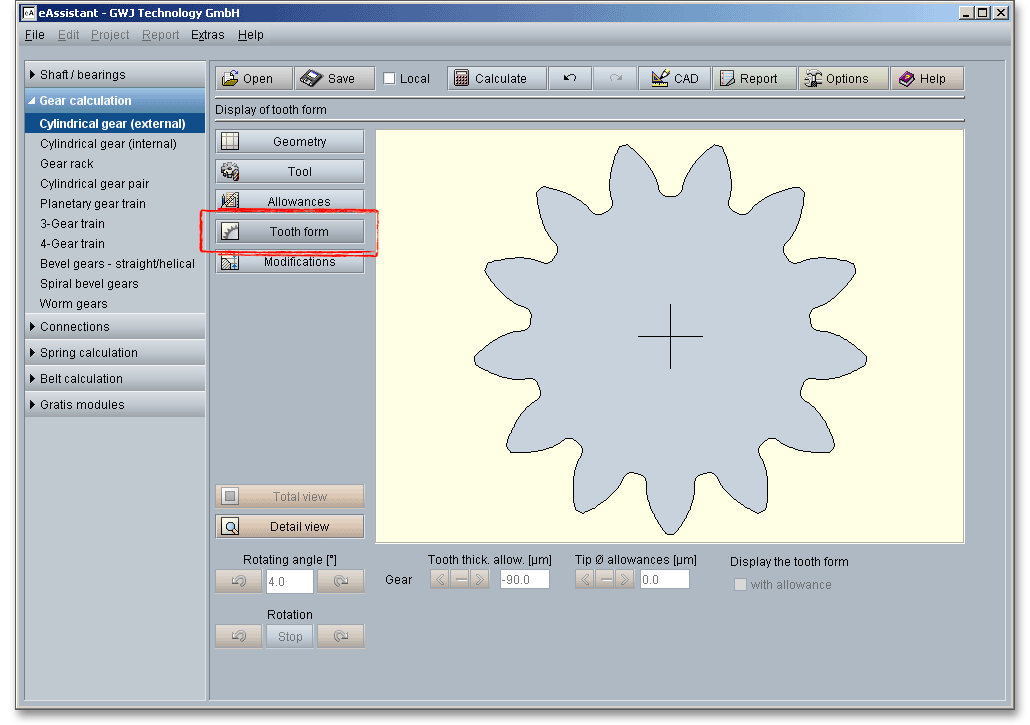
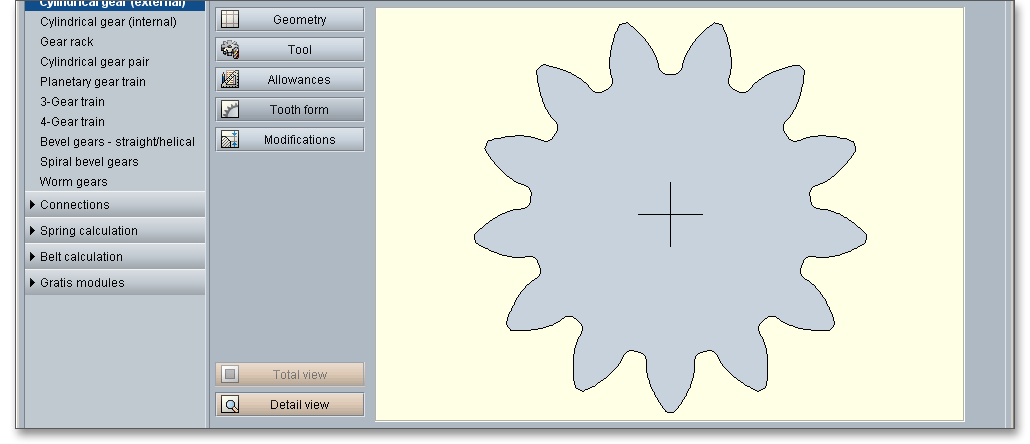
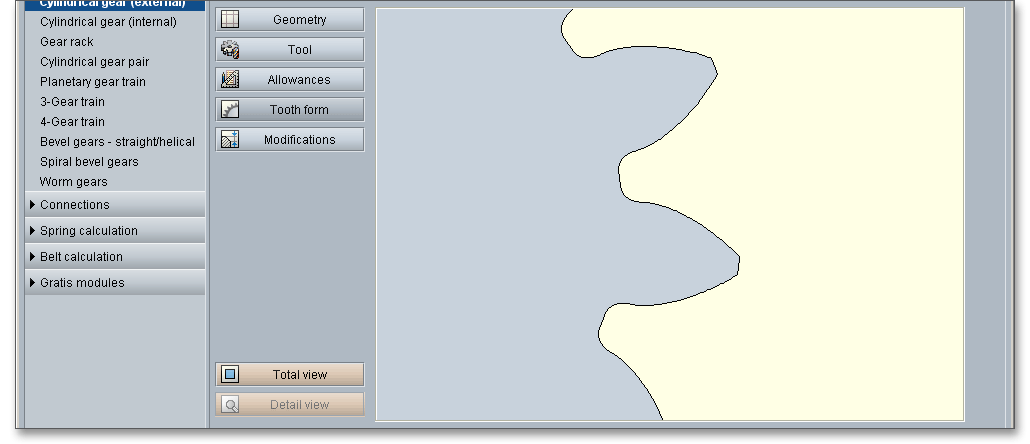
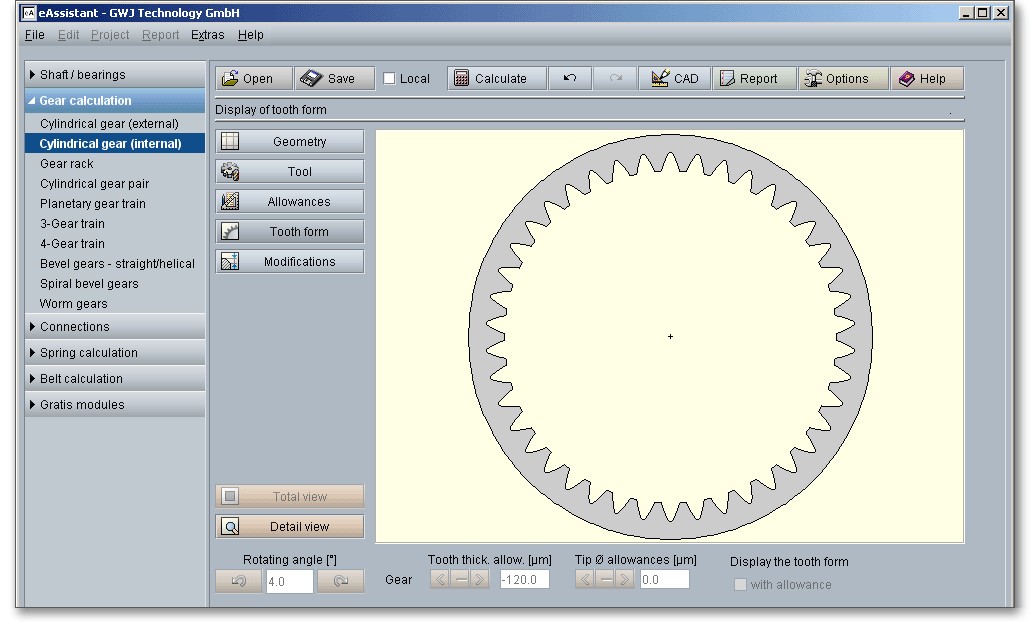
Please Note: If you define the geometry of the gear , you are able to look at the tooth form. Click on the button
‘Tooth form’ and select ‘Total view’ or ‘Detail view’. Click the button ‘Geometry’ and you get to the geometry input
again.
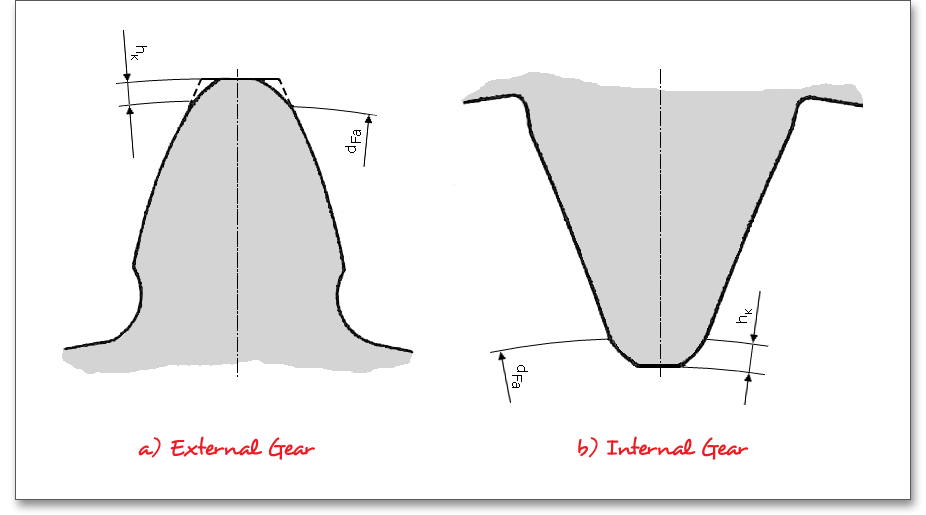
As an alternative to the addendum chamfer, a tip corner radius can be specified. This can be defined either as a radial amount or directly as a radius. The selection is marked by the colored arrow. The radius is entered directly for the tip radius, the radial amount is entered for the tip radius (Rad.).
If you enter the tip radius directly as a value, you will receive the corresponding radial amount in the calculation report.
In the case of tip corner radius or addendum chamfer, the tip form diameter is smaller than the tip circle diameter by twice the radial amount \(h_{K}\).
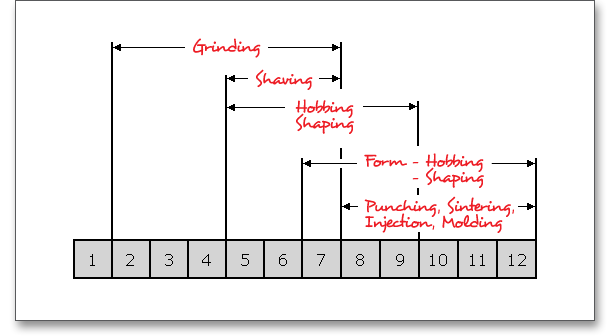
For the selection of the manufacturing process you have to consider the material, size of the gear, quantity, gear type (external or internal gears) and accuracy. The many methods of making gear teeth must be considered as well. The calculation program distinguishes between gear-tooth cutting and gear hobbing.
Please note: If you want to add some own notes, comments or a description, then use the comment
line.
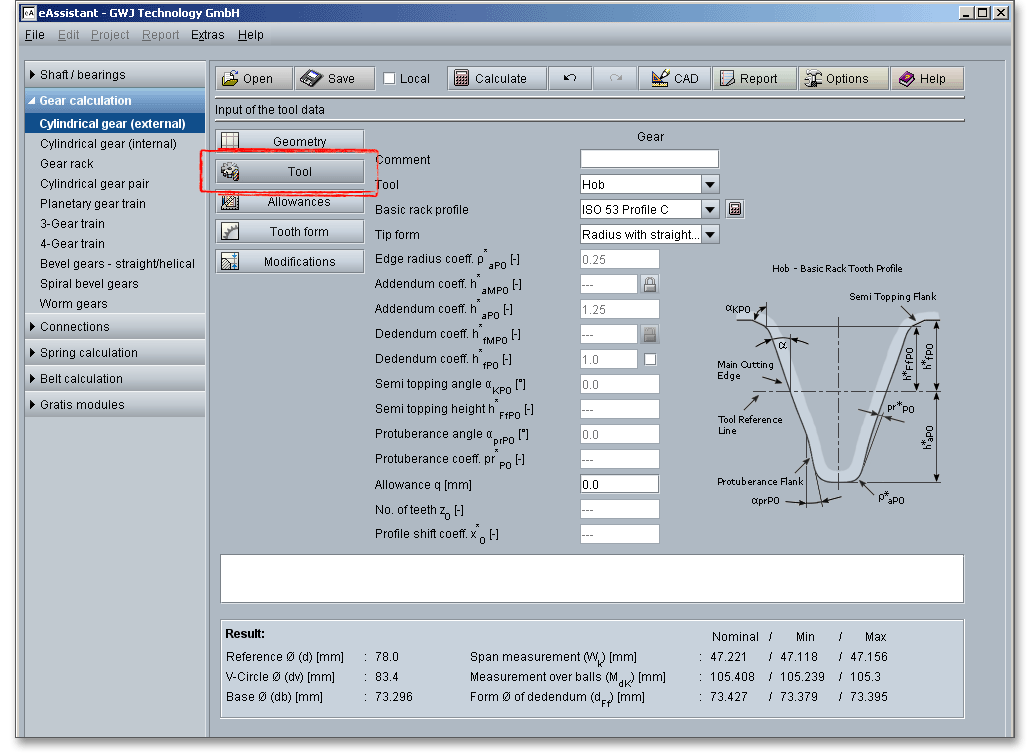
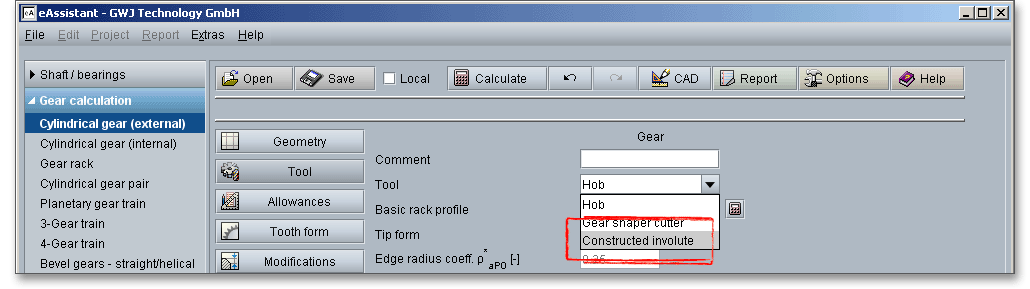
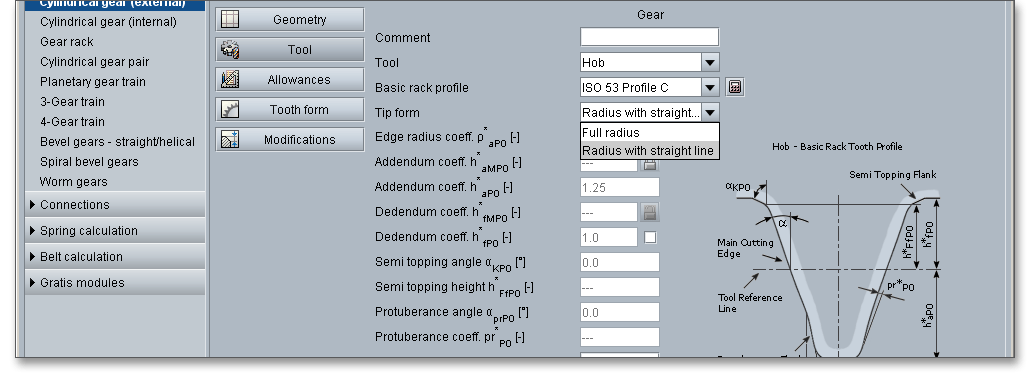
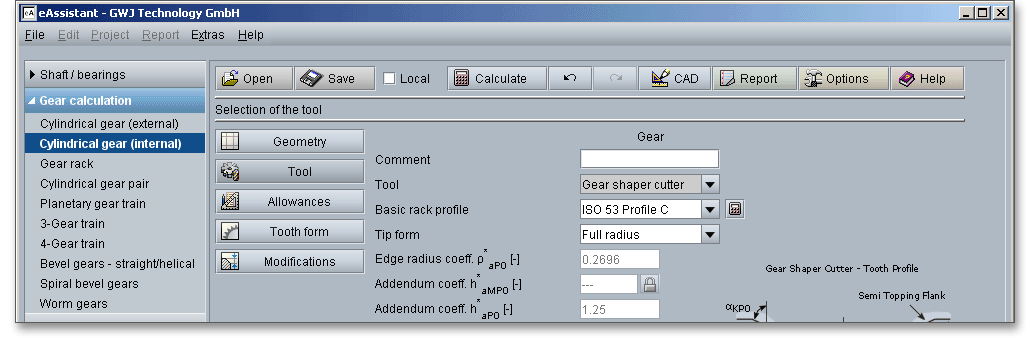
The most important manufacturing processes are gear hobbing and gear shaping. Select either the tool ‘Hob’ or ‘Gear shaper cutter’ by clicking the listbox. A ‘Constructed involute’ is also available. Basically, the selection of the tool depends on the gear type (external or internal gears). The external gears can be produced by cutting wherein the gear cutting tool is a hob. For internal gears a gear shaper cutter is used (see section 6.9 ‘Manufacturing Process for Internal Gears’).

The hobbing is the most widely used method of cutting gear teeth. The hobbing process is quite advantageous in cutting gears with very wide facewidth. A very high degree of tooth-spacing accuracy can be obtained with hobbing. With regard to accuracy, hobbing is superior to the other cutting processes. A wide variety of sizes and kinds of hobbing machines are used. The rotating hob has a series of rack teeth arranged in a spiral around the outside of a cylinder, so it cuts several gear teeth at one time. To generate the full width of the gear, the hob slowly traverses the face of the gear as it rotates. Thus, the hob has a basic rotary motion and an unidirectional traverse at right angles. Both movements are relatively simple to effect, resulting in a very accurate process.
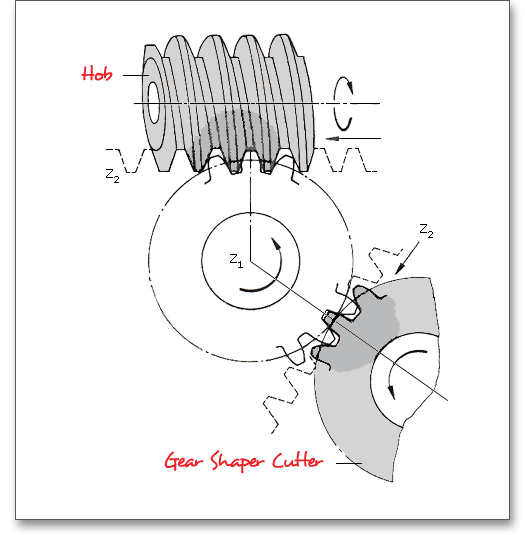
The shaping process is a gear-cutting method in which the cutting tool is shaped like a pinion. If a gear is provided with cutting clearance and is hardened, it may be used as a generating tool in a gear shaper. The cutter reciprocates while it and the gear blank are rotated together at the angular-velocity ratio corresponding to the number of teeth on the cutter and the gear. The teeth on the gear cutter are appropriately relieved to form cutting edges on one face. Although the shaping process is not suitable for the direct cutting of ultra-precision gears and generally is not as highly rated as hobbing, it can produce precision quality gears. Usually it is a more rapid process than hobbing. Two outstanding features of shaping involve shouldered and internal gears. For internal gears, the shaping process is the only basic method of tooth generation.
In addition to the hob and the gear shaper cutter, you can also select the entry ‘Constructed involute’ as a tool. In case internal gears cannot be shaped with a gear shaper cutter, the tooth form calculation is still possible by using the constructed involute. This specifically applies for applications in the precision mechanics. This method allows a generation of the tooth form with a constant root fillet radius.
The representation shows either the hob basic rack profile or the gear shaper cutter tooth profile. The radio buttons enable you to choose one of the graphical representation.
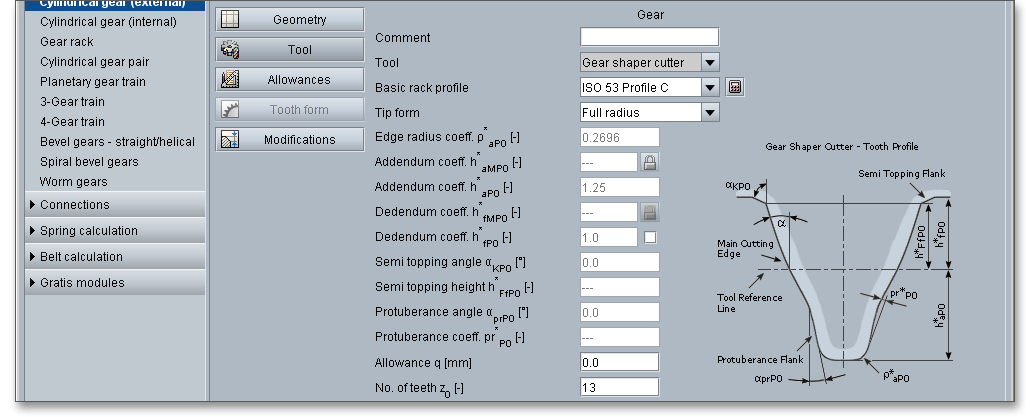
To mesh two gears with each other, the parameters have to be coordinated. The standard basic rack tooth profile is standardized in DIN 867. A gear with an infinite number of teeth will have straight lines for both the pitch and the base circles. The involute profile will be a straight line. The rack can be used to determine the basic parameters. Racks can be both spur and helical. A rack will mesh with all gears of the same pitch. The pressure angle and the gears pitch radius remain constant regardless of changes in the relative position of the gear and rack. The tool standard basic rack profile is the counter profile of the standard basic rack tooth profile. The following standard basic rack profiles are available for your calculation. Choose your profile from the listbox.

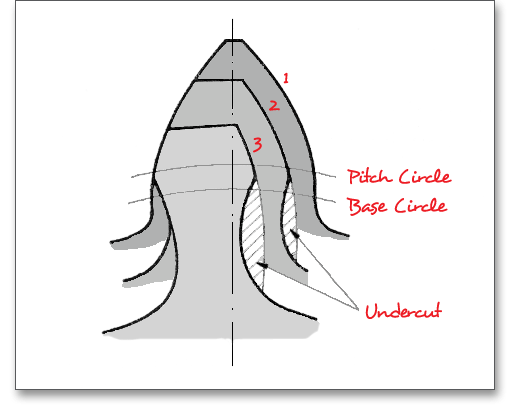
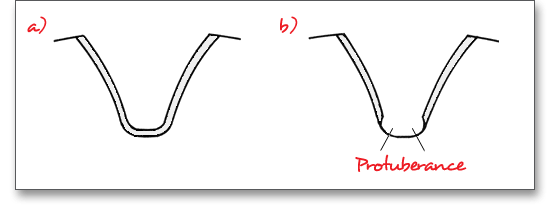
In addition to the standard basic rack profiles, you can also select a protuberance tool. When part of the involute profile of a gear tooth is cut away near its base, the tooth is said to be undercut. By using a protuberance tool an undercut near the root can be generated. Grinding notches at the tooth flank can be avoided during the grinding. That provides relief for subsequent finishing operations (see section 6.3.6 ‘Protuberance’).

You can select the following profiles:
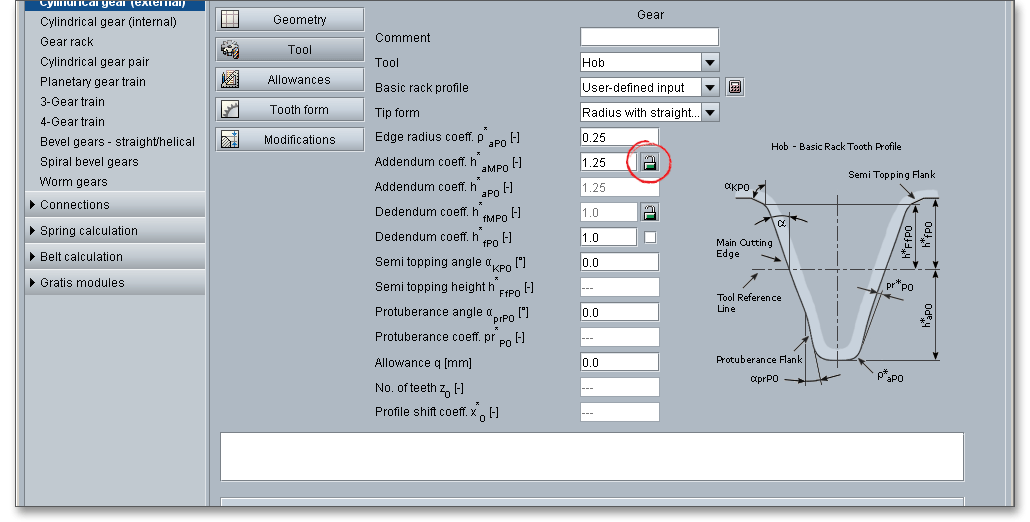
Please Note: If you select ‘user defined input’, then the input fields for the edge radius, the addendum coefficient and the dedendum coefficient are activated. Now you can modify the basic rack profile.

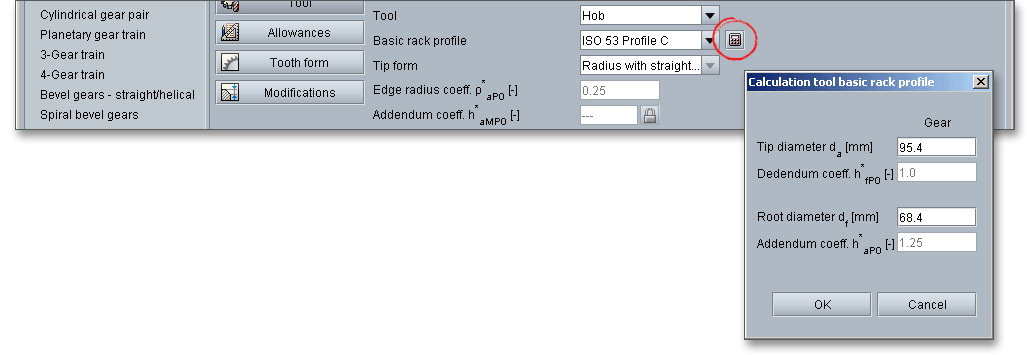
In case you use special tools, the eAssistant software offers an easy and comfortable solution. The basic rack profile can be determined by clicking the ‘Calculator’ button. Here you can change the tip circle and the root diameter for the gear. Confirm your entries with the button ‘OK’. The listbox for the basic rack profiles displays then ‘user defined input’. The modification of the tip diameter is set to ’0’.
For the tip form you can choose between ‘Full radius’ and ‘Radius with straight line’. Normally ‘Radius with straight line’ is used.
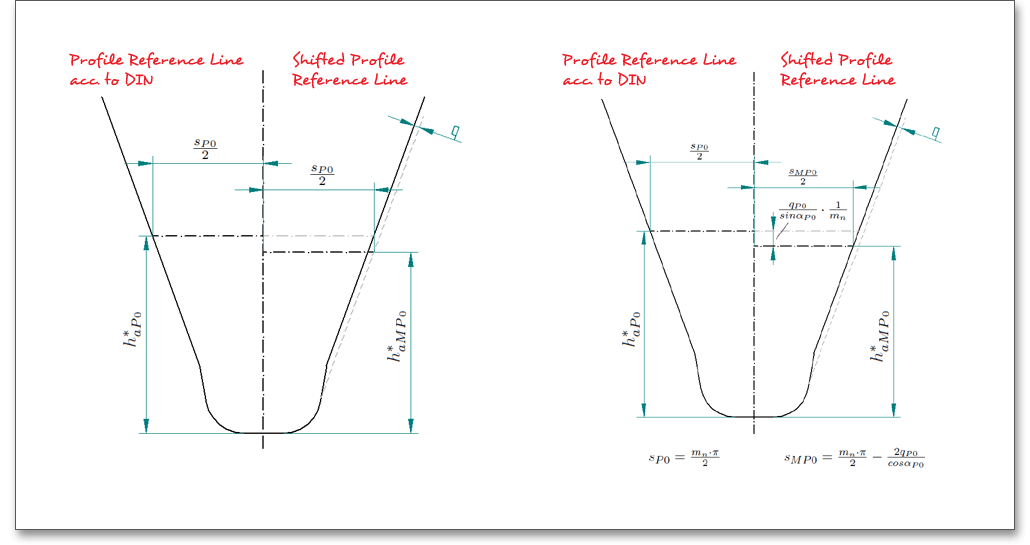
eAssistant provides a functionality for tools with a shifted profile reference line. Additionally to the addendum coefficient \(h^{*}_{aMP0}\) of the shifted profile, the dedendum coefficient \(h^{*}_{fMP0}\) is displayed and visible in the calculation report. The dedendum coefficient \(h^{*}_{fMP0}\) can also be defined by clicking the ‘Lock’ button so that the dedendum coefficient \(h^{*}_{fP0}\) of the converted, non-shifted basic rack profile is always 1.0 according to DIN 867.
With the definition of the semi topping flank, corresponding hobs can then be specified. These generate an
addendum chamfer during the cutting process. The option ‘Topping’ allows to define the tip diameter directly
with the dedendum coefficient of the tool, making it impossible to subsequently modifiying the tip
diameter. The result, at the same time, will be tip diameter allowances analogous to the root diameter
allowances directly from the tooth thickness allowances. The eAssistant 3D CAD plugins for various
CAD systems support the function and the semi topping flank can be considered in the 3D CAD
model.
Undercut may be deliberately introduced to facilitate finishing operations. Undercut is the loss of profile in the vicinity of involute start at the base circle due to tool cutter action in generating teeth with low numbers of teeth. The protuberance cuts an undercut at the root of the gear tooth. The protuberance design is also used in some cases to permit the sides of gear teeth to be ground without having to grind the root fillet.
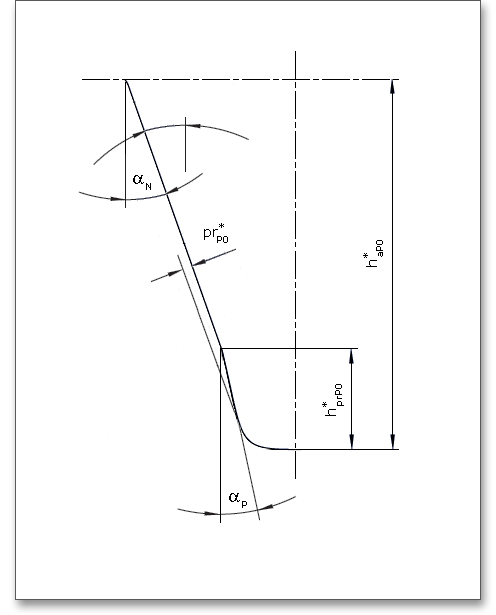
The following equation determines the amount of the protuberance. In case the height of the protuberance flank is given and not the amount of the protuberance, the amount of the protuberance may be calculated by this equation.
\[pr^{*}_{P0} = \frac {(h^{*}_{prP0} - \rho ^{*}_{aP0}\cdot (1-\sin (\alpha _{p})))\cdot \sin (\alpha _{n} - \alpha _{p})} {\cos (\alpha _{p})} + \rho ^{*}_{aP0} \cdot (1-\cos (\alpha _{n} - \alpha _{p})) \]
The following figure shows a representation:
To avoid grinding steps, a deviation in the tooth root area of the profile is a common and allowed method. Because of a grinding stock allowance, an undercut must be allowed. Hence, a larger tooth root thickness is necessary. The following table shows some determination of the undercut dependent upon the module.
| Undercut \(s_{pr}\) for Ground Gears Dependent upon Module2
| |||||
| Module | Allowance | Size of | Protuberance | Addendum | Edge Radius |
| \(m\) | \(q\) | Undercut \(s_{pr}\) | \(pr^{*}_{P0}\) | \(h^{*}_{aP0}\) | \(\rho ^{*}_{aP0}\) |
| 2 | 0,160 | 0,100 | 0,260 | 2,900 | 0,500 |
| 2,5 | 0,170 | 0,110 | 0,280 | 3,625 | 0,625 |
| 3 | 0,180 | 0,120 | 0,300 | 4,350 | 0,750 |
| 4 | 0,200 | 0,140 | 0,340 | 5,800 | 1,000 |
| 5 | 0,220 | 0,160 | 0,380 | 7,250 | 1,250 |
| 6 | 0,240 | 0,180 | 0,420 | 8,700 | 1,500 |
| 7 | 0,260 | 0,200 | 0,460 | 10,150 | 1,7500 |
| 2 from: Linke, H.: Stirnradverzahnung Berechnung Werkstoffe Fertigung, Carl Hanser
Verlag, Muenchen, Wien, 2nd ed. 2010, p. 68, table 2.1/2
| |||||
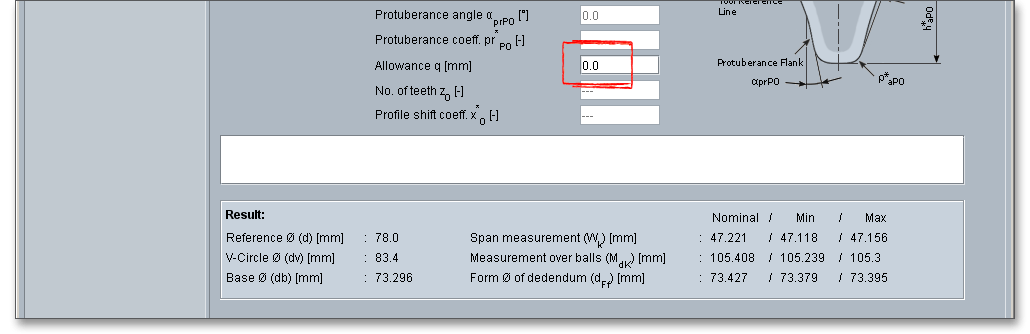
You can consider an allowance for the tooth flank. The tool provides an allowance \(q\) on the flank and/or root for the pre-cutting tool. The allowance is the smallest distance between the involutes and the pre-machining having the same root diameter. In case you select the tool basic rack profile with protuberance, the allowance refers to the tooth flank.
If the allowance of the tool basic rack profile is selected without protuberance, then tooth flank and tooth root get the allowance.
| Maximum Machining Allowances3
| |
| Allowance per Tooth Flank | Manufacturing Process |
| \(<\) 0.05 (0.10) mm | Finishing operation by cold rolling, gear shaving, honing, lapping |
| 0.05 to 0.5 (1.5) mm | Grinding, profile grinding, (honing) |
| \(>\) 0.5 mm, pre-cutting | Primary shaping, forming, cutting with geometrically determined edges except shaving, grinding and profile grinding in special cases |
| 3 from: Linke, H.: Stirnradverzahnung Berechnung Werkstoffe Fertigung, Carl Hanser
Verlag, Muenchen, Wien, 1996, p. 638
| |
A manufacturing of work-pieces with accurate nominal dimensions is impossible. Hence, a deviation from the nominal size has to be allowed. For a lot of applications the gear and the pinion of a pair must be independently manufactured and meshed without any modifications. That means, the parts have to be separately replaceable. In addition to DIN 3961 for gear tolerances/gear qualities, DIN 58405 for precision engineering as well as ISO 1328 and ANSI/AGMA 2015 are available.
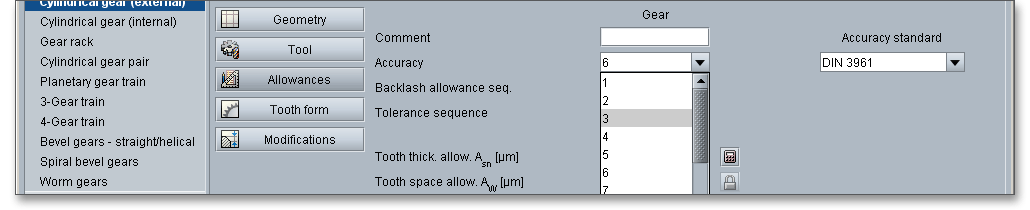
The choice of the right toothing quality is determined by economical aspects depending upon the intended purpose and manufacturing process. In all fields of gearing, the control of gear accuracy is essential. Several classes or grades of accuracy can be set. 12 grades (12 to 1) are defined according to DIN standards. High accuracy grades can be set for a long-life, high speed gears. Lower accuracy grades will cover medium- or slow-speed grades. Accuracy grade ‘1’ describes the highest possible accuracy, ‘12’ a very low accuracy. The gear accuracy ‘1 to 4’ is mainly used for master gears, quality ‘5 to 12’ is used for gear wheels (figure from: Niemann, G.: Maschinenelemente, Vol. 2, Getriebe allgemein, Zahnradgetriebe-Grundlagen, Stirnradgetriebe, 1989, p. 73, figure 21.4/1).
Select the appropriate quality between 1 and 12 by using the following listbox.
The following table provides some reference values for the selection of the quality, tolerances for gearings made of metal and plastics:
| Toothing Made of Metal4
| |||
| \(\nu \) | Machining | Quality | Tolerance Sequence |
| to m/s | of Tooth Flanks | (Accuracy) | DIN 3967 |
| 0.8 | Cast, raw | 12 | 2x30 |
| 0.8 | Rough-machined | 11 or 10 | 29 or 28 |
| 2 | Finish milled | 9 | 27 |
| 4 | Finish milled | 8 | 26 |
| 8 | Fine finished | 7 | 25 |
| 12 | Shaved or ground | 6 | 24 |
| 20 | Precision-ground | 5 | 23 |
| 40 | Precision-machined | 4 or 3 | 22 |
| 60 | Precision-machined | 3 | 22 or 21 |
| Toothing Made of Injection Molding Plastics
| |||
| Application | d | Quality | Tolerance Sequence |
| in mm | (Accuracy) | DIN 3967 | |
| Gearings with high requirements | to 10 | 9 | 27 |
| Gearings with high requirements | 10 to 50 | 10 | 28 |
| Gearings with normal requirements | 10 to 50 | 11 | 29 |
| Gearings with low requirements | to 280 | 12 | 2 x 30 |
| Toothing made of plastic manufactured by cutting
| |||
| Gearings with high requirements | to 10 | 8 | 25 to 27 |
| Gearings with high requirements | 10 to 50 | 9 | 26 to 28 |
| Gearings with normal requirements | to 50 | 10 | 27, 28 |
| Gearings with normal requirements | 50 to 125 | 11 | 27, 28 |
| Gearings with low requirements | to 280 | 12 | 28 |
| 4 from: Karl-Heinz Decker: Maschinenelemente: Gestaltung und Berechnung, 1992, p.
512, table 23.3
| |||
For the gear tolerances/gear qualities, DIN 58405 for precision engineering as well as ISO 1328 and
ANSI/AGMA 2015 are also available. For ISO 1328 and ANSI/AGMA 2015, two qualities can be selected in each
case. The first quality is comparable with the tolerances permitted according to DIN 3961, the second value
influences the radial composite deviation as well as the roll deviations.
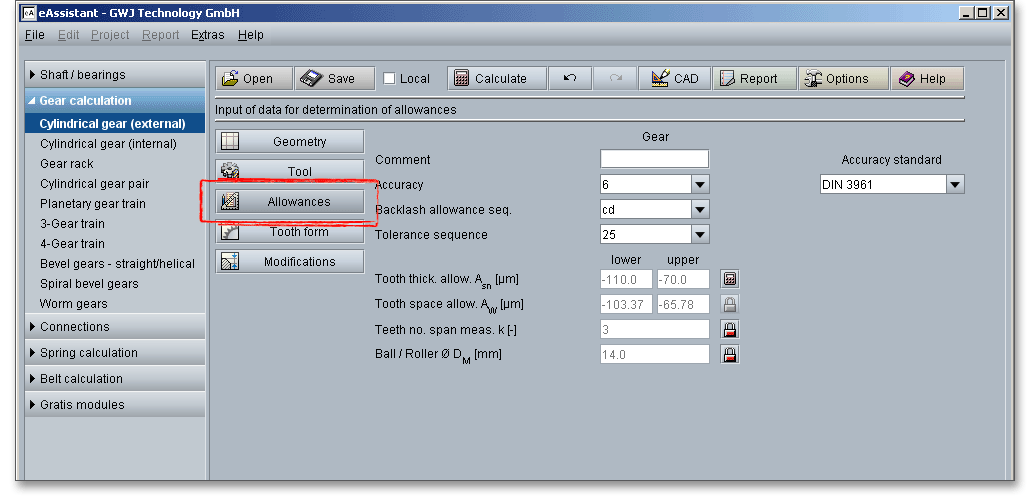
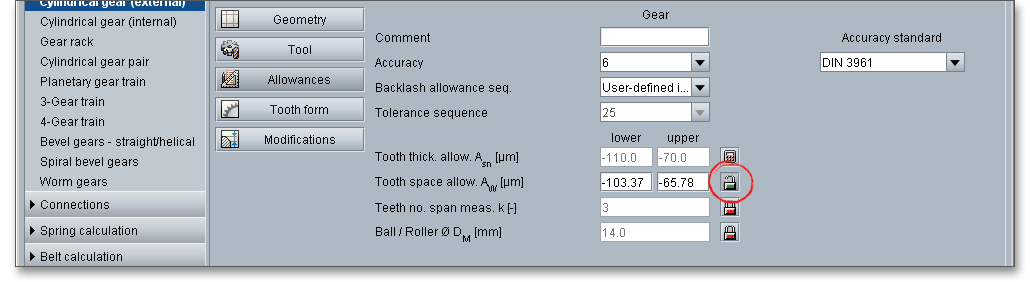
The system for gearings is very similar to the DIN system of fits and tolerances. For the system of fits for gear transmissions letters are used to indicate the deviation from basic (nominal) size, a number defines the width. There are clearance fits for gearings, therefore, lower case characters ‘h’ to ‘a’ appear. If you select the entry ‘user defined input’, the input field for the tooth thickness allowances is enabled and you can define your individual values.
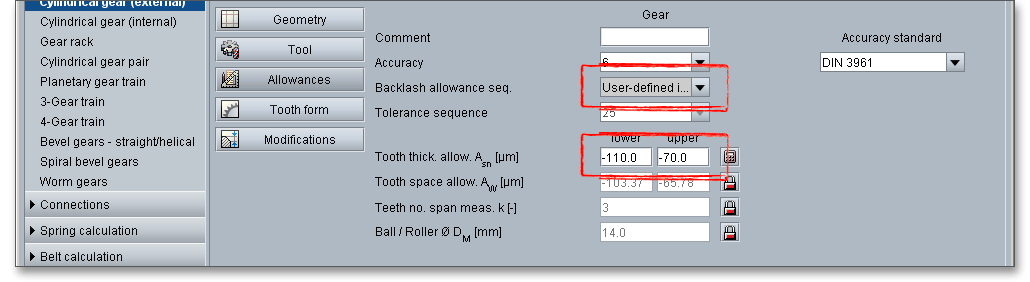
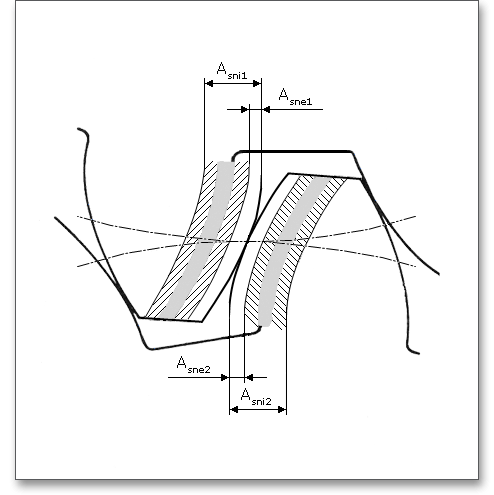
One of the most important criteria of gear quality is the specification and control of tooth thickness. The magnitude of tooth thickness and its tolerance is a direct measure of backlash when the gear is assembled with its mate. Dimensional changes, due to thermal expansion, do not allow a zero-backlash assembly. The tooth thickness allowance has to be determined that no jamming occurs. To prevent that jamming of gears during the operation, it is necessary to decrease tooth thickness by a minimum amount (\(A_{sne}\) and \(A_{sn}\)).
The eAssistant software offers the possibility to specify the tooth thickness allowances based on measured data or given test dimensions. Click on the ‘Calculator’ button.

A new window is opened.
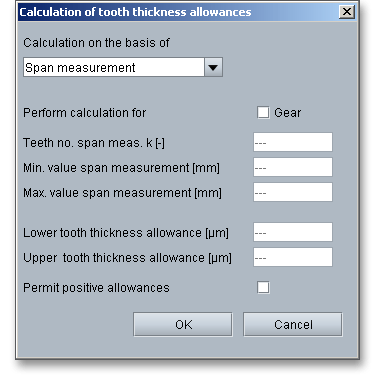
Activate gear 1 and gear 2 and enter the input values. Confirm with the button ‘OK’. The ‘Lock’ button next to
the input field for the tooth space allowances is enabled. Now you can change the tooth space
allowances.
The tooth space allowance \(A_{W}\) is the difference between the actual dimension and the nominal dimension of the span measurement \(W{_k}\). The actual measurement of the span measurement gets smaller for external gears by negative allowances for a zero-backlash assembly. The upper and lower tooth space allowance are displayed as well. For an own input of the tooth thickness allowances, the tooth space allowances can be defined as well. The ‘Lock’ button next to the input field of the tooth space allowances is enabled. Therefore, you can change the tooth space allowances.
The tooth thickness of a gear may be measured directly with calipers or it may be determined indirectly by diameter pins. The sizing of gears may be controlled by double-flank composite checks and centre distance settings corresponding to maximum and minimum tooth thickness specifications. Different measurement methods are used:
In the following you get some information on the widely used measurement methods:
Span measurement \(W_{k}\) is the measurement of the distance across several teeth in a normal plane. As long as the measuring device has parallel measuring surfaces that contact on an unmodified portion of the involute, the measurement will be along a line tangent to the base cylinder. It is a widely used method for gauging the tooth thickness by using the span measurement. The tooth thickness of spur or helical gears is often measured with calipers. An advantage is that the dimensions can be influenced during the manufacturing.
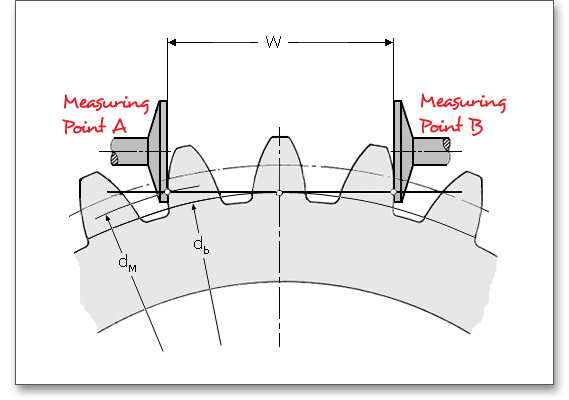
The calculation program determines the number of teeth for the span measurement (number of teeth across the span measurement has to be gauged). By using the ‘Lock’ button you are able to activate the input field and you can enter your own input value. If you click the button again, the previous input value appears.

The tooth thickness is often checked by measurement over pins \(M_{dR}\) or balls \(M_{dK}\). The pins or balls are placed in diametrically opposed tooth spaces (even number of teeth) or nearest to it (odd number of teeth). Measurement over pins is the measurement of the distance taken over a pin positioned in a tooth space and a reference surface. The reference surface may be the reference axis of the gear, a datum surface or either one or two pins positioned in the tooth space or spaces opposite the first. The measurement over pins is only used for spur gears and external helical gears. For the measurement values a distinction is made between:
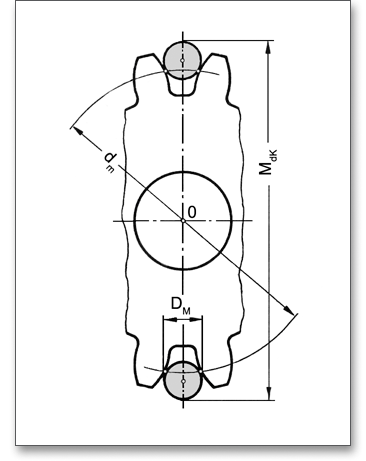
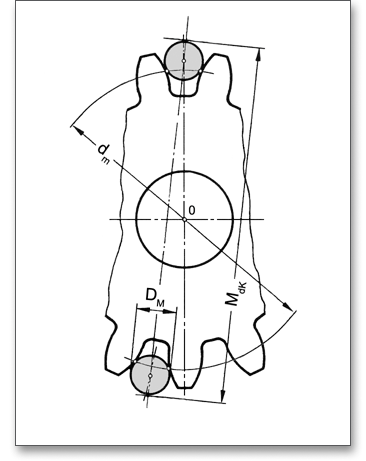
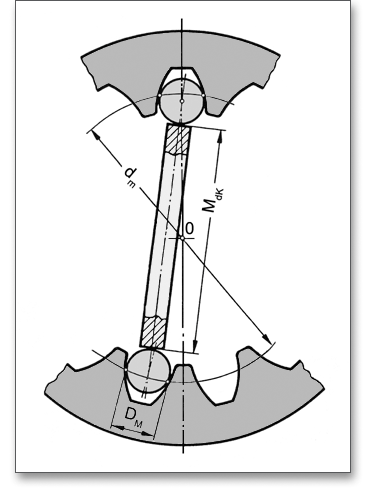
For an external gear the measurement over balls \(M_{dK}\) is the largest outer measure. The two balls are placed in diametrically opposed tooth spaces. The balls have to be in the same plane perpendicular to a gear axis. For an internal gear (see figure: ‘Internal spur gear with odd number of teeth’) the measurement over balls is the smallest inner measure between the balls. \(D_{M}\) is the diameter of ball or pin. The internal gear is generally checked for tooth thickness with measuring pins, like the external gear. However, the measurement is made between the pins instead of over pins.
|
| Measurement over balls:External spur gear with evennumber of teeth |
|
| Measurement over balls: External spur gear with oddnumber of teeth |
|
| Measurement over balls: Internal spur gear with oddnumber of teeth |
The eAssistant software already specifies the diameter of ball or pin for the test dimensions. Enable the input field by clicking the ‘Lock’ button. Enter your own input value for the diameter. If you click on the button once again, the previous input value appears.

Please Note: In the calculation report you can find all results for the span measurement or measurement over
balls and pins in section ‘Test dimensions’.
A special highlight of this calculation module is the presentation of the accurate gear tooth form with an animation and simulation of the tooth mesh. For the presentation you can select the lower, upper and mean allowances for the tooth thickness, tip diameter and centre distance. When you define the geometry for the gear pair, then you can have a look at the tooth form at any time. Click on the ‘Tooth form’ button and you get a general or detailed view of the tooth form. By clicking the ‘Geometry’ or ‘Tool’ button, you can open the main input masks of the calculation module again.
Please Note: Please keep in mind that all values are later taken over to the DXF output and CAD generation. In case you change the tooth thickness allowance or the centre distance allowance in the tooth form mask, then the last modification is taken over to the DXF output. The section 6.17 contains some helpful information on this function.
Click on the ‘Tooth form’ button to represent the gear tooth form.
Please Note: Please keep in mind that you can check the backlash and the mesh ratio only in the
presentation of the mesh. The gear mesh will be discussed in the following section ‘Representation of
Mesh’.
Click on the ‘Detail view’ button. You get a larger representation of the gear tooth form. Now you can see the detailed tooth mesh. Click on the ‘Total view’ button to obtain an entire view of the cylindrical gear pair.
Please Note: The representation of the tooth mesh allows you to look at the tooth thickness allowances, the tip diameter and centre distance allowances as well the tooth mesh and to check the influence of these values. The tooth form mask provides various functions. Find a short description of these functions in the following section.
Enter an rotating angle for the rotation of the spur gear pair.

|
| Rotation of the driving gear counter-clockwise |
|
| Rotation of the driving gear clockwise |
When you click on one of the two arrows, a continuous rotation of the spur gears occurs.

|
| Continuous rotation of the driving gear counter-clockwise |
|
| Continuous rotation of the driving gear clockwise |
|
| The rotation is stopped. |
Click on the ‘Detail view’ button and the tooth mesh is represented in detail. Now you can change the tooth thickness allowance, that is already given in the main mask for the ‘Allowances’, within the tolerance limit. All changes are displayed immediately. For the representation of the tooth mesh, select the lower, upper and mean tooth thickness allowances for the gear.

Both arrows indicate the lower and upper allowance. The active input is grayed out and disabled. Click on the left arrow and you will get the representation for the lower tooth thickness allowance. The right arrow shows the representation for the upper tooth thickness allowance. The middle button displays the mean tooth thickness allowance. At the first start of the tooth form, you will get the mean tooth thickness allowance as a standard feature.
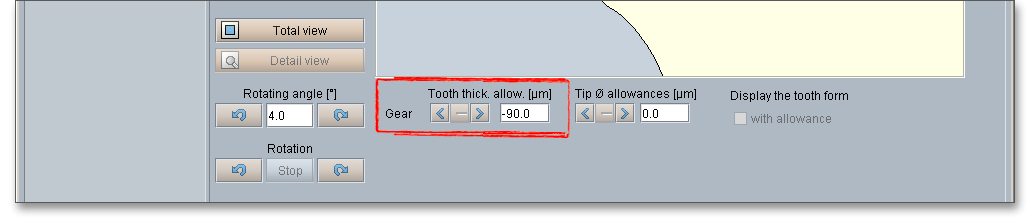
Please Note: In case you have specified the lower and upper tooth thickness allowance for gear the gear in the
input mask ‘Allowances’ by using the ‘Calculator’ button, then the manually defined values appear here as lower
and upper tooth thickness allowance.
Click the ‘Detail view’ button and the tooth mesh is represented in detail. Now you can change the tip diameter allowance, that is already given in the main mask for the ‘Geometry’, within the tolerance limit. All changes are displayed immediately. For the representation of the tooth mesh, select the lower, upper and mean tip diameter allowances for the gear.

Both arrows indicate the lower and upper allowance. The active input is grayed out and disabled. Click on the left arrow and you will get the representation for the lower tip diameter allowance. The right arrow shows the representation for the upper tip diameter allowance. The middle button displays the mean tip diameter allowance. At the first start of the tooth form, you will get the mean tip diameter allowance as a standard feature.
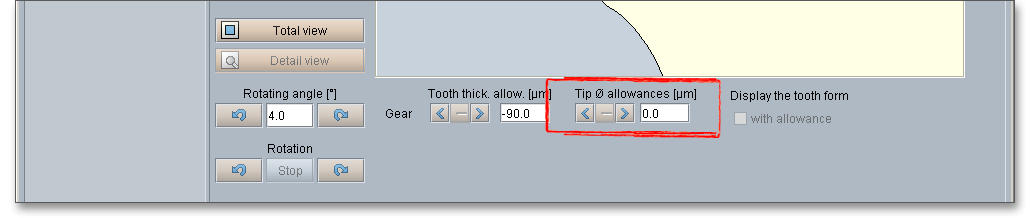
Please Note: In case you have specified the lower and upper tip diameter allowance for the gear in the input
mask ‘Geometry’ by using the ‘Lock’ button, then the manually defined values appear here as lower and upper
tip diameter allowance.
Manufacturing errors, misalignment in the assembly of the gears as well as displacement of the gears under load lead to non-uniform load carrying across the facewidth and move a significant concentration of load to the tooth edges. Intentional deviations from the involute profile (profile modification) and from the theoretical tooth trace (flank modification) are used to minimize the manufacturing inaccuracies and elastic deformations, to improve the running behavior and to reduce the noise of the gear pair.
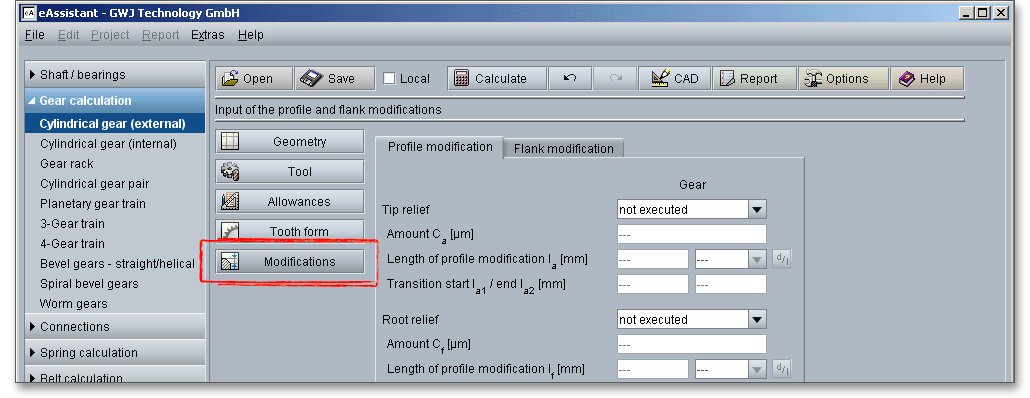
There are different types of tooth corrections. Short and long linear or short and long circular tip and
root relief are typical tooth profile modifications. Lead crowning and end relief are common flank
modifications. These corrections tend to give better load distribution over the facewidth and can reduce the
effects of misalignment. Using profile or flank modification requires an appropriate degree of gear
accuracy. The minimum required gear manufacturing accuracy is DIN quality 7 or better. Design details
should be based on a careful estimate of the deformations and manufacturing deviations of the
gearing.
In case of gear tooth profile modification, parts of the involute profile are changed to reduce the load in that area. Profile modifications help gears to run more quietly and to regulate transmission errors.
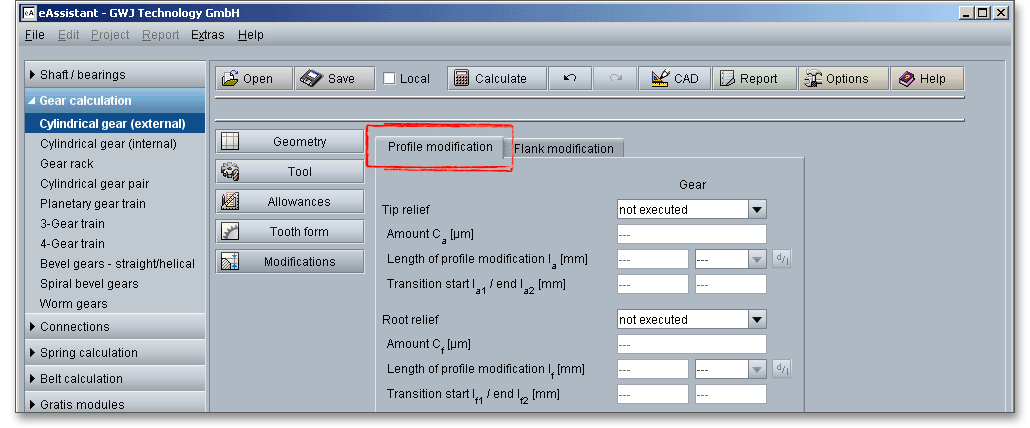
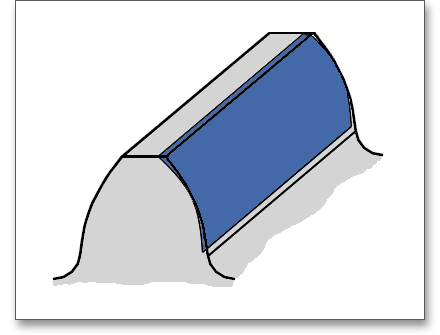
Tip relief is a modification whereby material is removed at the tips of the gear tooth. In case of root relief, a small amount of material is removed near the root of the gear tooth. The modified tooth profile merges as continuously as possible into the theoretical tooth profile. Profile crowning can be seen as a combination of tip and root relief.
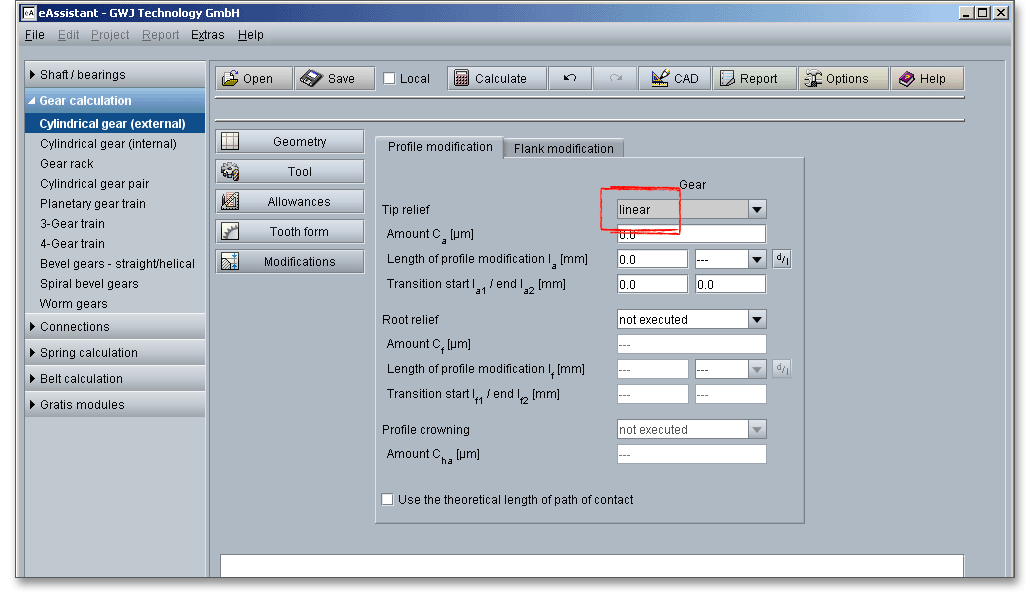
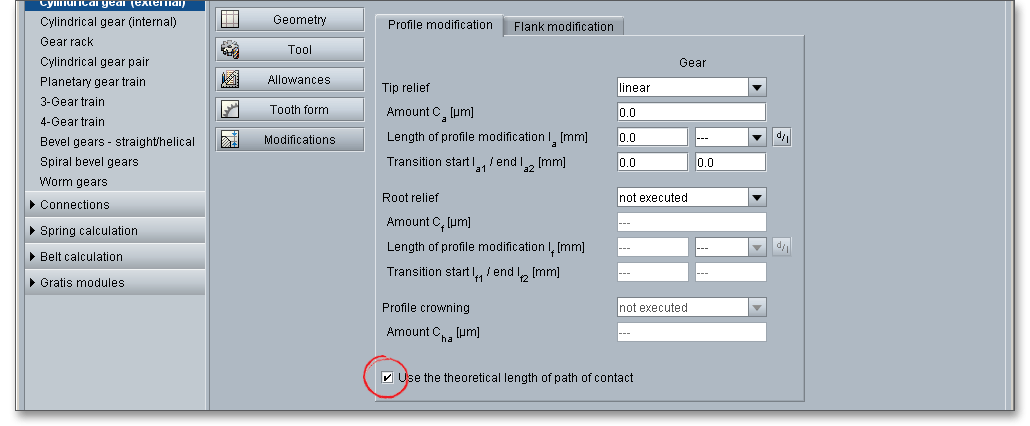
There are different types that can be chosen for the profile modification. A simple type of profile modification is
the linear tip relief on pinion and gear. However, it is also possible to execute only one gear with a tip and root
relief instead of both gears. The listbox allows to select linear and circular profile modification. The
linear relief results in the greatest material removal and thus the greatest relief in the effective flank
area.
When determining the lengths of the profile correction, a distinction is made between short and long profile modification. In case of long tip and root relief, the entire double contact area is corrected, while in the case of short execution, only half of the double contact area is removed. Either long or short reliefs are used on a gearing. The long profile modification is usually suitable for a quiet operation, while the short profile correction has better load behavior. As long as the overlap ratio is sufficient, a long profile correction is more suitable for helical gearing.
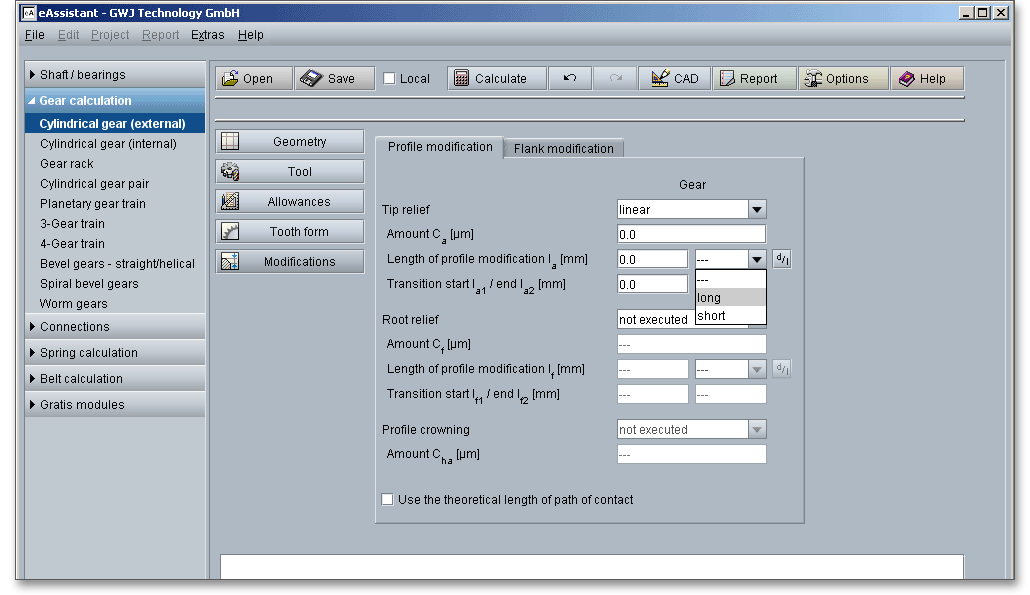
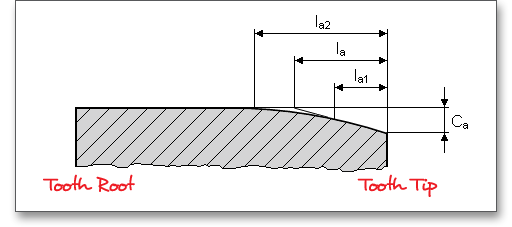
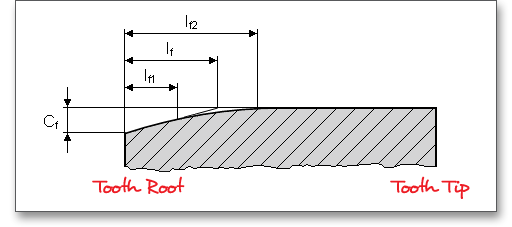
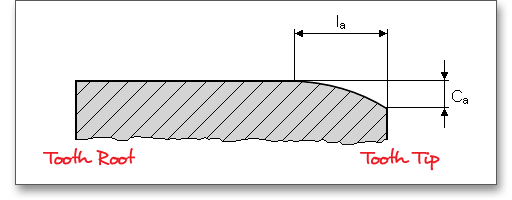
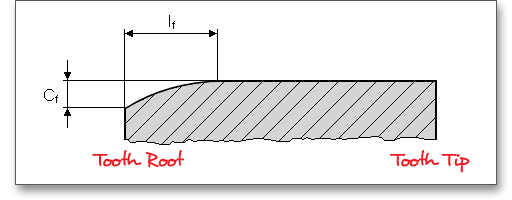
The linear tip and root relief is executed in the eAssistant with a transition rounding from the modified to the unmodified area. You can enter the start and end of the transition rounding in the corresponding input fields. For circular relief, the input of the transition start and transition end is not required.

In case you know the relief length, you can simply enter this value into the input field. In case the length is unknown, select ‘short’ or ‘long’ from the listbox. The eAssistant software determines the relief length automatically. If a diameter is given on the drawing, it is possible to define the diameter. Click the ‘d/l’ button on the right side to switch between the input for diameter or length.
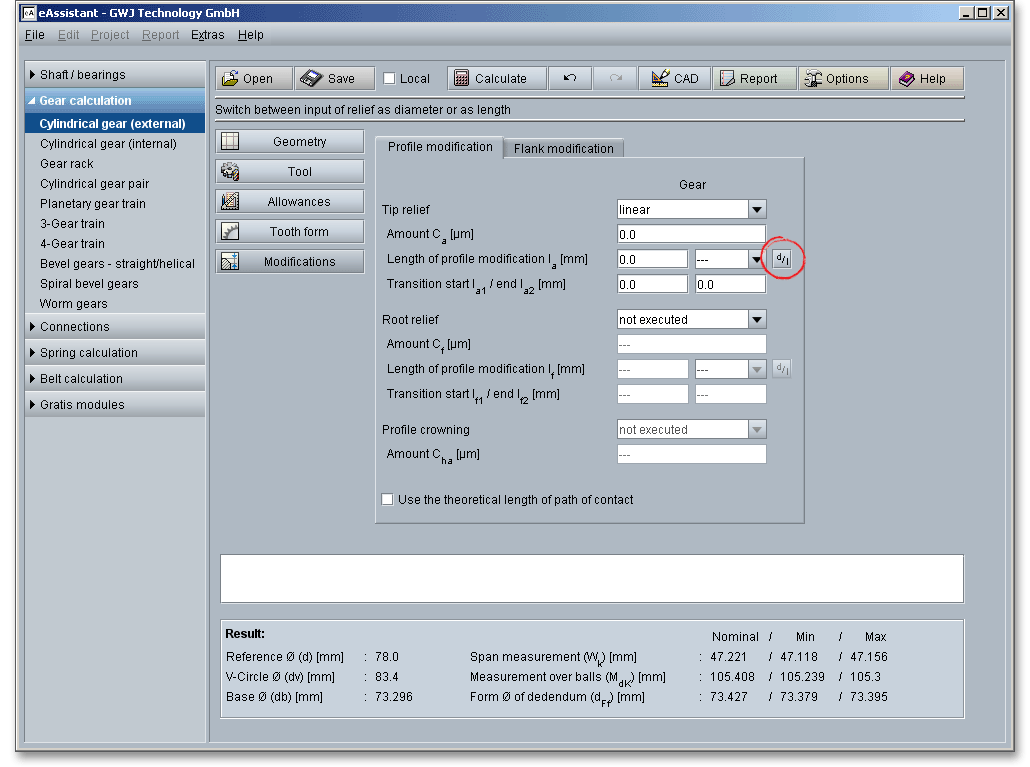
When you enable the checkbox ‘Use theoretical length of path of contact’, then the theoretical path of contact of a gear with a rack is used.
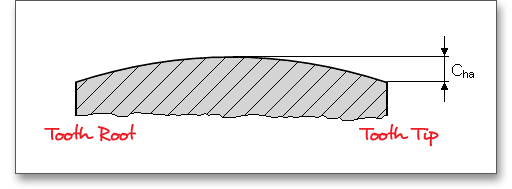
Profile crowning can be seen as a combination of tip relief and root relief. Material is removed from the tip and from the root of the tooth.
You can select symmetric profile crowning from the listbox and add a value for \(C_{ha}\) to the input field.
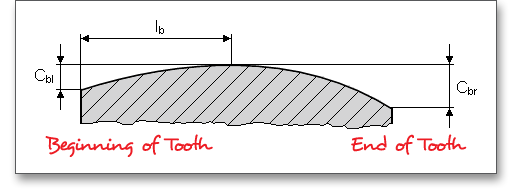
Gear flank modifications are intentional deviations from the theoretical tooth trace. Lead crowning and end relief are typical gear flank modifications and are advantageous for a better load distribution across the facewidth of the gear. Both can compensate for misalignment so that the stresses do not rise at the tooth ends.
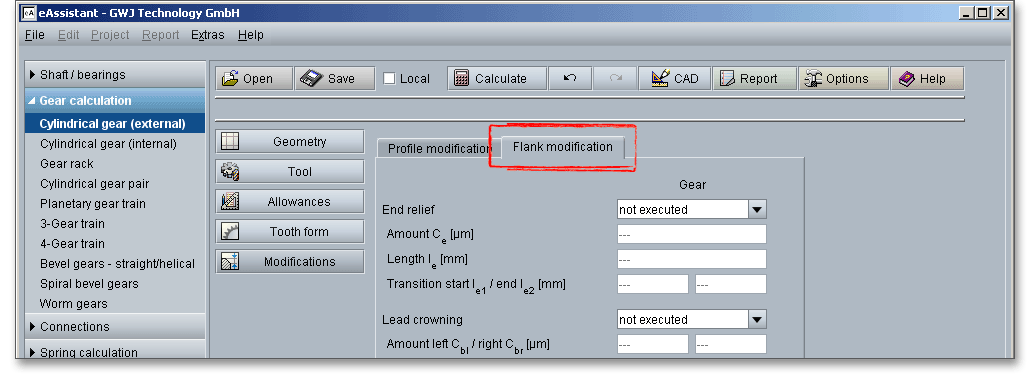
Due to mesh misalignments, an overloading of the tooth ends occurs. Therefore, end relief is used to protect the tooth ends from overloading. Usually, the relief applied is the same at both ends of the teeth. In case crown shaving and crown grinding are not possible, then end relief is recommended.
End relief can be applied to both tooth ends or to the left or right end of the tooth.

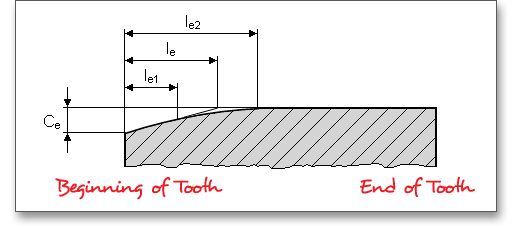
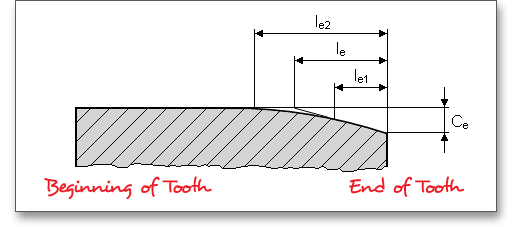
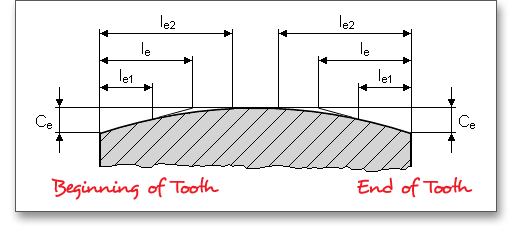
According to DIN 3990 Part 1, the height of end relief is calculated as follows:
For through-hardened gears: \(C_{e} \approx F_{\beta xcv}\) plus a manufacturing tolerance of 5 to 10 \(\mu m\). Thus, by analogy with \(F_{\beta xcv}\) (initial equivalent misalignment) in DIN 3990, \(C_{e}\) should be approximately:
\[C_{e} = f_{sh} + 1,5 \cdot f_{H\beta }\]
For surface hardened and nitrided gears: \(C_{e} \approx 0,5 \cdot F_{\beta x cv}\) plus a manufacturing tolerance of 5 to 10 \(\mu m\). \(C_{e}\) should be approximately:
\[C_{e} = 0,5 \cdot (f_{sh} + 1,5 \cdot f_{H\beta })\]
According to DIN 3990 Part 1, the width (or length) of end relief can be determined as follows:
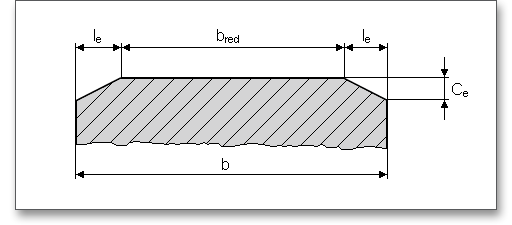
For approximately constant loading and higher tangential velocities:
\(l_{e}\)= smaller of the values \(0,1 \cdot b\) or \(1 \cdot m\)
The following is appropriate for variable loading, low and average speeds:
\[b_{red} = (0,5\ to\ 0,7) \cdot b\]
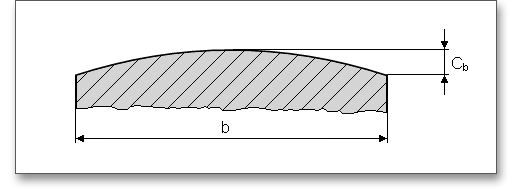
Lead crowning is a common way of crowning is the so-called lead crowning. This type is employed in order to compensate for manufacturing deviations and load-induced deformations of the gears and in particular to relieve the tooth-endloading.
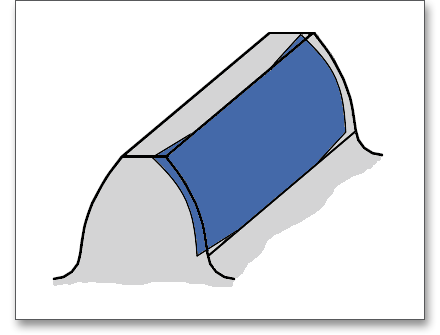
Gears are usually crowned symmetrically about the mid-facewidth and the tooth center is slightly thicker than the tooth edges. The tooth flanks of the gear have a slight outward bulge in its center area. It is possible to select symmetrical and asymmetrical lead crowning from the listbox.
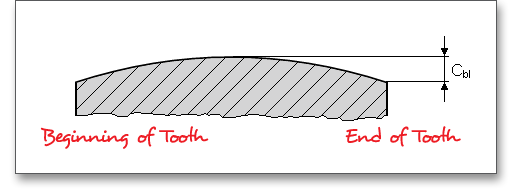
According to DIN 3990 Part 1, the height of lead crowning can be determined as follows:
\[C_{b} = 0,5 \cdot (f_{sh} + 1,5 \cdot f_{H\beta })\]
When the gears are of such stiff construction that \(f_{sh}\) can for all practical purposes be neglected or when the helices have been modified to compensate for deformation at mid-face width, the following value can be substituted:
\[C_{b} = f_{H\beta }\]
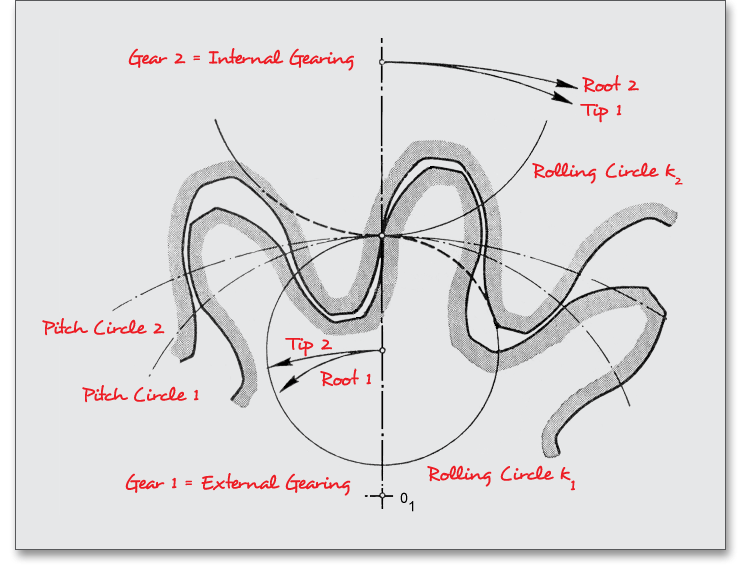
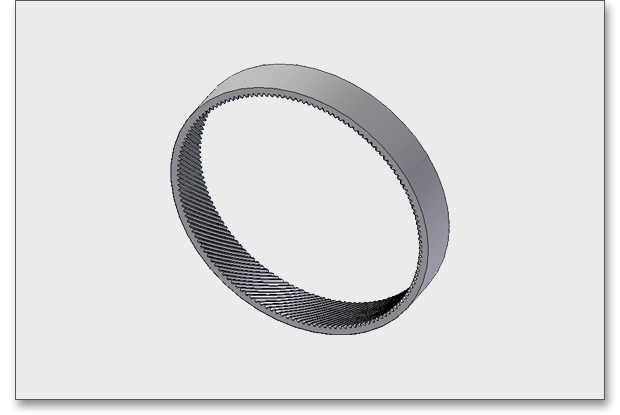
The eAssistant provides the calculation of internal gears.
A special feature of spur and helical gears is their capability of being made in an internal form, in which an
internal gear mates with an ordinary external gear. An internal involute gear has either spur or helical teeth cut
on the inside of a ring.
General advantages of internal gears:
General disadvantages of internal gears:
Some inputs for the internal gears differ from the inputs for external gears. Nevertheless, internal gears can be calculated very fast. The following provides the most important changes for the input of internal gears.
For an external gearing a right-hand teeth and a left-hand teeth can only mesh correctly. An internal gear has
the same helix angle in degrees and the same hand its mating pinion. A right-hand pinion meshes with a
right-hand gear and vice-versa.
Internal gears may be either spur or helical. Internal helical gearings have their advantages and disadvantages just like external helical gearings.
General advantages over internal spur gears are:
General disadvantages are:
For the creation of an internal helical gear, only the helix angle \(\beta \) has to be considered.
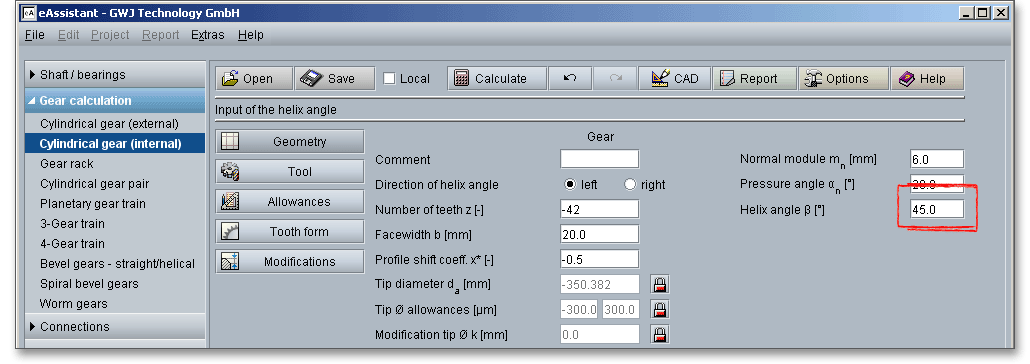
Because the internal gear is reversed relative to the external gear, the tooth parts are also reversed relative to an ordinary external gear. Tooth proportions and standards are the same as for external gears except that the addendum of the gear is reduced to avoid trimming of the teeth in the fabrication process. The number of teeth is negative for internal gears. The tip, reference and root diameter are negative as well. By default, a negative number of teeth appears when you open the module for single internal cylindrical gears.
For an internal gear the tooth tip is enlarged by shifting towards the tooth centre and the tooth root is enlarged by shifting away from the tooth centre. The internal gear is reversed relative to the external gear. A profile shift of an internal gear is positive in direction to the tooth tip and negative in direction to the tooth root. It applies for both internal and external gearings:
A positive profile shift has the following influences:
The positive profile shift may be disadvantageous for internal gears. It is comparable with a negative profile shift for external gears. A negative profile shift has the following influences:
Please Note: A negative profile shift may be advantageous for internal gears. In this case, it is comparable with a positive profile shift for external gears. For external and internal gear pairs the impacts of positive and negative profile shift are similar.
For internal gears, the shaping process is the only basic method of tooth generation. Internal gears cannot be hobbed. Only in some very special cases rack-type tools can be used. They can be shaped, milled or cast. In small sizes they can be broached. Both helical and spur internals can be finished by shaving, grinding, lapping or burnishing. In case the gear shaper cutter itself is generated by using a rack tool, then the mesh of the gear flanks is limited by the proper tooth tip of the gear rack.
An internal gear mates with an ordinary external gear and the number of teeth of the external gear must be less
than that of the gear to be cut for the internal gear. A rack profile can be a basic rack profile for internal gears.
But the basic rack profile cannot be used for generating internal gears. Internal gears are produced by a gear
shaper cutter. The number of teeth of the gear shaper cutter must be, according to the amount, smaller
than the number of teeth of the internal gear. The shaping is a continuous process. The cutting
tool is a spur shaper cutter. During the machining, tool and gear roll on each other. A feed motion
occurs.
The gear mesh of an internal gear pair can be much more difficult than for external gears. Interferences for internal gears occur far more frequently than for external gearings. In case a meshing interference takes place, a warning is displayed in the message window. The following meshing interferences can appear in the calculation module:
When shaper cutter and internal gear are in mesh, the generation meshing interference occurs due to
tool cutter action in generating teeth with low numbers of teeth. Because of this interference there
is a loss of the involute profile at the tooth tip. The term of the mesh and the load capacity are
decreased.
If the chosen gear shaper cutter is too large and the teeth of the internal gear are cut off in the feed
direction, a feed meshing interference occurs. If the sum of the profile shift is decreased, feed meshing
interferences can be avoided. It is also possible to adjust the number of teeth of the gear shaper
cutter.
The calculation module provides a message window. This message window displays detailed information, helpful hints or warnings about problems. One of the main benefits of the program is that the software provides suggestions for correcting errors during the data input. If you check the message window carefully for any errors or warnings and follow the hints, you are able to find a solution to quickly resolve calculation problems.

The quick info tooltip provides additional information about all input fields and buttons. Move the mouse pointer over the input field or button, then you will get the additional information. This information will be displayed in the quick info line.
All results will be calculated during every input and will be displayed in the result panel. A recalculation occurs after every data input. Any changes that are made to the user interface take effect immediately. In case a minimum safety is not fulfilled, the result will be marked red. Press the Enter key or move to the next input field to complete the input. Alternatively, use the Tab key to jump from field to field or click the ‘Calculate’ button after every input. Your entries will be also confirmed and the calculation results will displayed automatically.

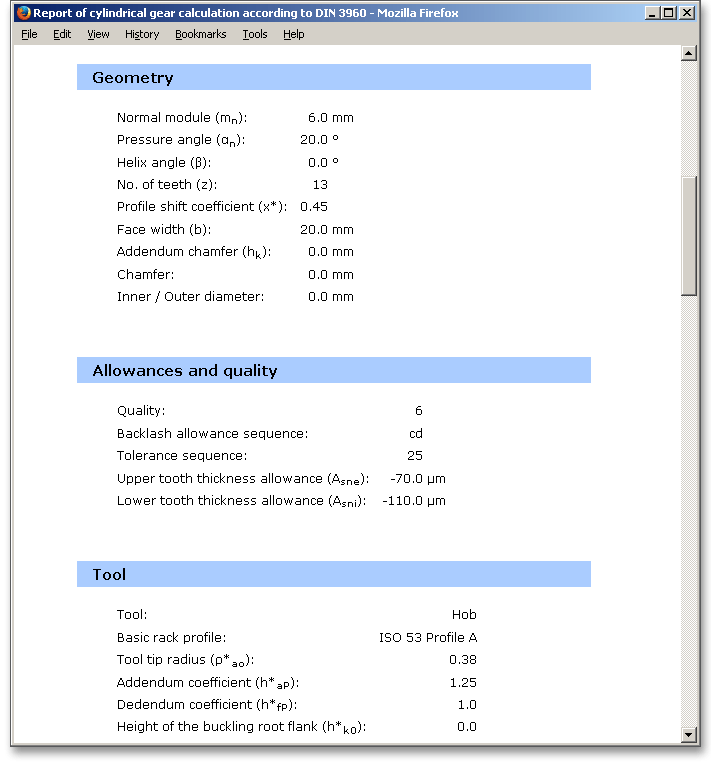
After the completion of your calculation, you can create a calculation report. Click on the ‘Report’ button.

The calculation report contains a table of contents. You can navigate through the report via the table of contents that provides links to the input values, results and figures. The report is available in HTML and PDF format. Calculation reports, saved in HTML format, can be opened in a web browser or in Word for Windows.
You may also print or save the calculation report:
When the calculation is finished, it is easy to save the calculation. You can save your calculation either to the eAssistant server or to your computer. Click on the button ‘Save’.

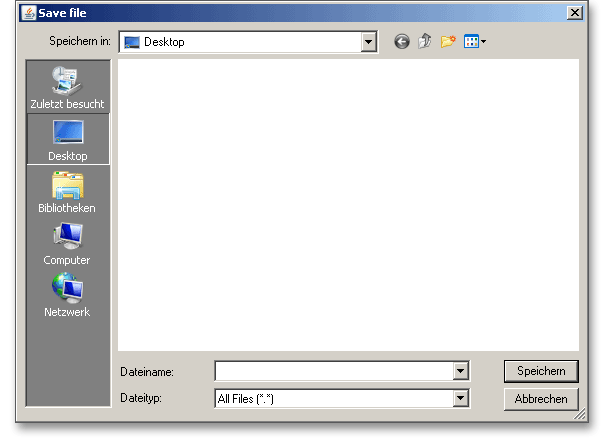
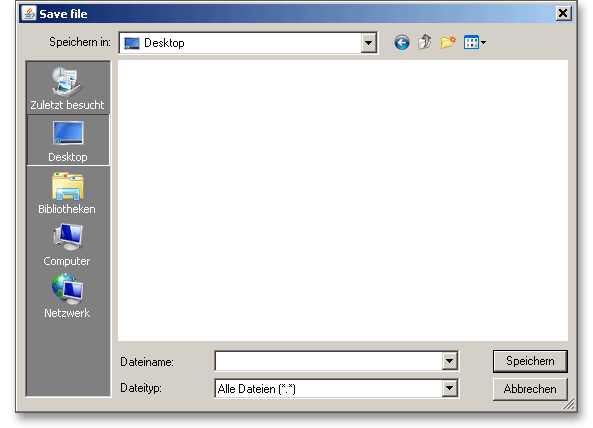
Before you can save the calculation to your computer, you need to activate the checkbox Local’ in the calculation module. A standard Windows dialog for saving files will appear. Now you will be able to save the calculation to your computer.
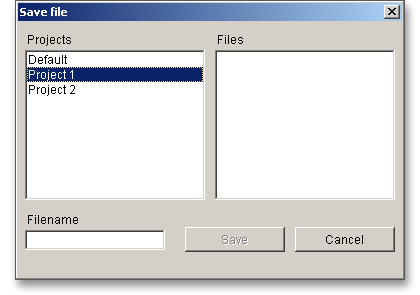
In case you do not activate the option in order to save your files locally, then a new window is opened and you can save the calculation to the eAssistant server. Please enter a name into the input field ‘Filename’ and click on the button ‘Save’.
The ‘Undo’ button allows you to reset your inputs to an older state. The ‘Redo’ button reverses the undo.

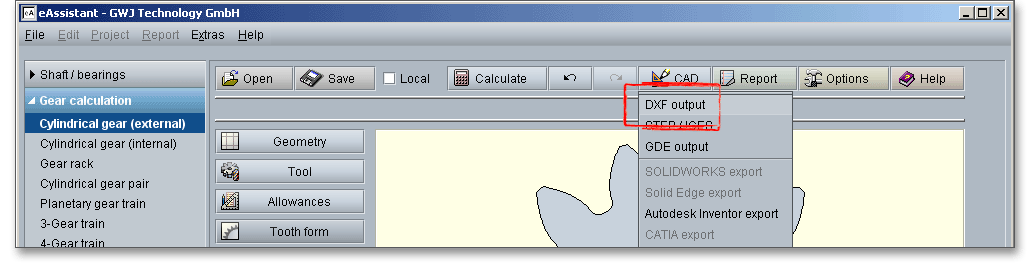
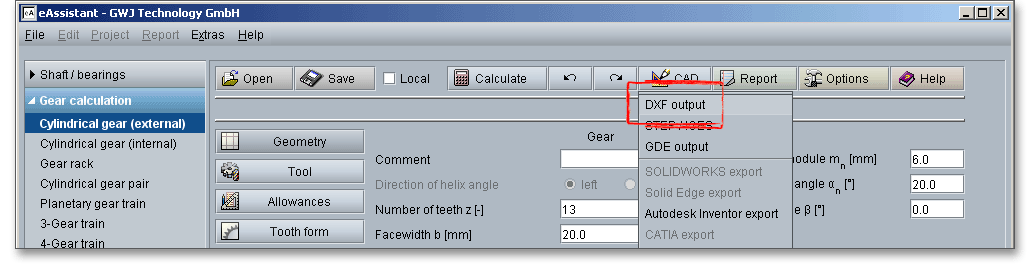
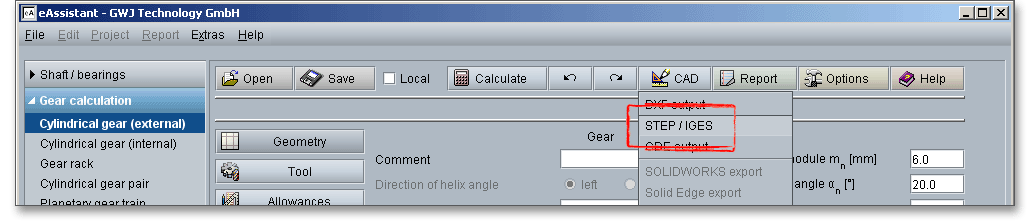
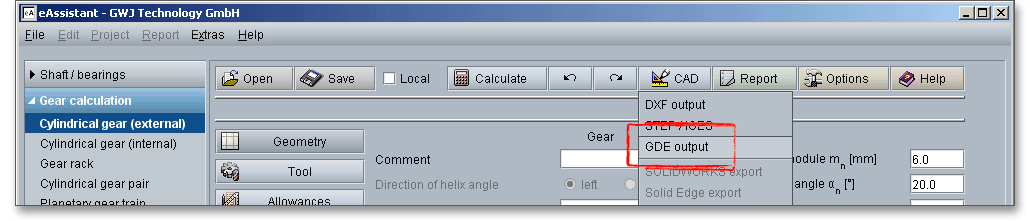
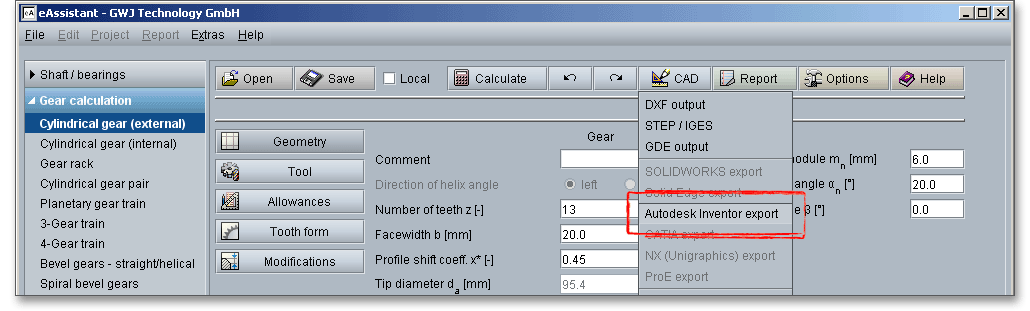
The top menu bar of the eAssistant software provides the button ‘CAD’.

The eAssistant plugin for various CAD systems (e.g., SOLIDWORKS, Solid Edge, Autodesk Inventor) offers a
great way to combine calculation and design. On the basis of the eAssistant calculation, you can generate
single cylindrical gears in a 2D DXF format or create as a 3D part within seconds.
Click on the menu item ‘CAD \(\Rightarrow \) DXF Output’. Now you are able to create the accurate tooth form of any involute gearing in the 2D DXF format. Use the various settings for the DXF output.
For the DXF output the following options are possible:
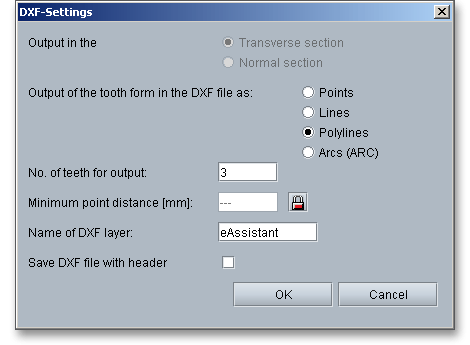
When you have defined all settings, then click on the button ‘OK’. A standard Windows dialog is opened to save the file.
Now you can save the DXF file to your computer. Enter a name for the file and click on the button ‘Save’. It is not necessary to specify the file extension. The file is identified automatically.
Using this function allows to create the geometry of cylindrical gears as 3D CAD models in STEP or IGES format. STEP as well as IGES are two standardised neutral file formats for CAD models. Almost every 3D CAD system can import STEP files.
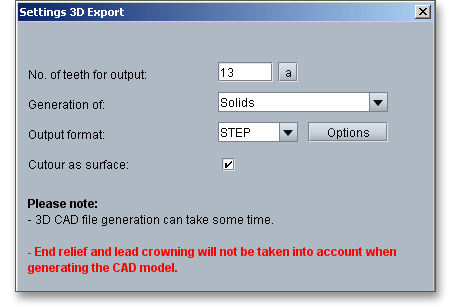
The settings menu for the STEP and IGES output has a few different functions and allows to adjust the export options as needed. The geometry can be generated as a solid model with one or all teeth or as a surface model of the tooth space geometry. When exporting to a CAD system, you can also set the level of accuracy to a desired value.
With the integration of the standardised GDE format into the modules for gears and involute splines, eAssistant takes a step closer to a seamless data workflow. GDE stands for Gear Data Exchange. This format, which is defined in VDI/VDE guideline 2610, is already supported by many measuring machine manufacturers. With the GDE format, geometries of cylindrical gears and involute splines can be loaded directly from the software into the measuring machine. It only takes a few clicks to create a measuring program. This avoids transmission errors and allows to work with standard measuring instructions.
The eAssistant plugin for various CAD systems (e.g., SOLIDWORKS, Solid Edge, Autodesk Inventor) enables you to combine calculation and design very easily and fast. Based on your eAssistant calculation, you can generate external and internal spur and helical gears as a 3D part within seconds. Allowances, addendum chamfer, profile shift and profile modifications (tip and root relief) are taken into consideration. A single menu pick in the eAssistant software transfers the eAssistant calculation data to the CAD system. Based on these parameters, the automatic creation of a 3D parametric model starts in the CAD system.
The CAD model stores all features and dimensions as design parameters. The eAssistant calculation is linked
and associated to the part and can be opened at any time throughout the entire design phase.
This is also possible if one part contains different calculations. Click the button ‘CAD’ and select
the CAD plugin. Open the CAD system and start the generation by clicking the integrated button
‘eAssistant’.
Please note: First you need to download and install the right CAD plugin for your CAD system. The plugin is
available on our web site www.eAssistant.eu. After installation, an integrated button called ‘eAssistant’ appears
in the CAD system.
With just one click, the design table with all manufacturing details can be placed on the drawing. The
appearance and size of that table is individually configurable. There is no need to manually add all design table
parameters to the drawing. For further information, please visit our web site www.eAssistant.eu or read the
manual.
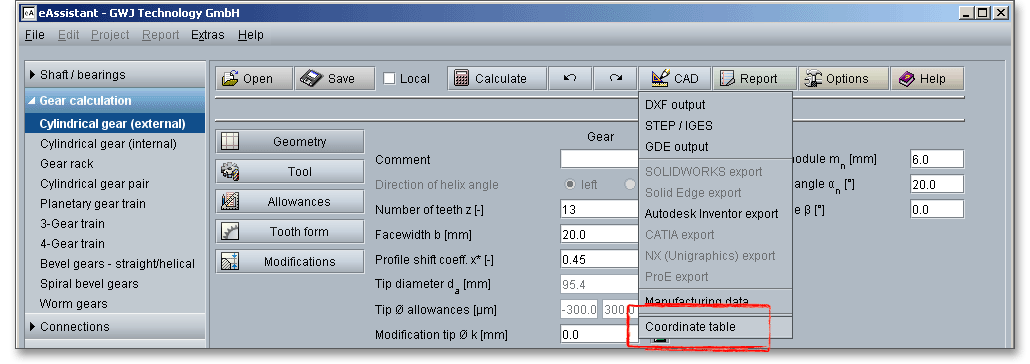
The button ‘CAD \(\Rightarrow \) Manufacturing data’ allows to save the manufacturing data to a text file.
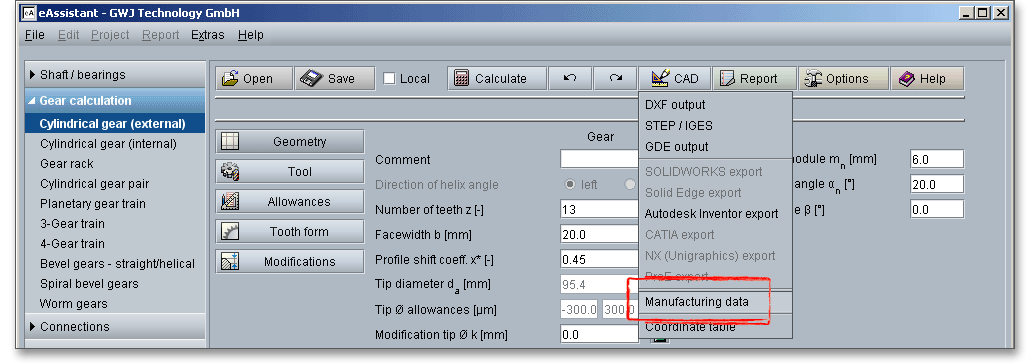
The gear tooth form geometry of a tooth space can be exported as a coordinate text file in transverse section as well as in normal section.
Click on the button ‘Options’ in the top menu bar of the eAssistant software.

This option allows you to change some general settings: